Pages

30 December 2009

Mussels, Pork & Leek in Parsley White Wine Cream Sauce

This is something I put together for brunch the day after Christmas. We had leftovers left right and center. The mussels were originally purchased for consumption as part of the Christmas dinner, but about 3/4 way through the cooking we decided to 'save it for later' because we already had too much food on the table. I used the off pieces from my pork belly confit mostly because it took me 26 hours to make the confit and I didn't want to throw any bits of it away. :)

This can be substituted with leftover pork roast, ham, turkey or even just slices of good ol' bacon.

Mussels with Pork and Leek in Parsley White Wine Cream Sauce
serves 4
  • 1 tablespoon of olive oil
  • 1 tablespoon butter
  • 2 cloves garlic (mashed then chopped roughly)
  • 2 anchovy fillets
  • 1 leek (sliced thinly)
  • 1 bay leaf
  • left over pork belly confit (roughly chopped ...substitute with bacon)
  • 1/2 cup of white wine
  • 150ml thicken cream
  • 1 kg live black mussels (scrubbed, debearded)
  • 1/2 cup of parsley leaves (roughly chopped)
  • Salt & Pepper to taste
  • lemon wedges to serve
Heat olive oil in a deep saucepan then melt the butter in the oil. Add garlic, anchovy fillets and when everything starts to sizzle and melt, add the leek, bay leaf and the leftover pork belly confit (or bacon) to the saucepan. Saute until the leeks start to soften. Season with a couple of grinds of black pepper. Pour in the white wine and let it simmer for about 3 mins to boil off the alcohol and to reduce the liquid then add in the thickened cream.

Pour in the washed mussels. Turn the heat up high and keep stirring the contents in the pan around until the mussels start to open.

Once the mussels start to open, add in the chopped parsley (reserve about a tablespoon for garnish) and stir the contents around until the mussels are coated with the cream sauce. Serve immediately and garish with the remaining chopped parsley leaves and lemon wedges.

mussels in pork leek and white wine sauce
Notes:
  • The anchovy fillets will provide the saltiness to the dish. Taste and season with a bit more salt if required.
  • Toast up some garlic bread to soak up the cream sauce. Or use the leftover cream sauce to toss in some hot pasta for a quick meal.

27 December 2009

Bolognese Sauce

I still have a week off before I have to go back to work. So I've been mostly occupying my time with slow cook foods - now that I do have the time to do it. This Bolognese recipe is something I eyed some time back on Spinach Tiger and always wanted to try it out but never had the time. I really wanted to try it out because it required each individual step to reach a certain stage before moving on. Like completely cooking off the wine and milk. That's two cups of milk by the way.. I really wondered how long that would take. :P

Bolognese Sauce
Recipe adapted from Spinach Tiger - Originally from Marcella Hazan’s Essentials of Classical Cooking

Serves 6-8
  • 2 Tablespoon vegetable oil
  • 6 Tablespoon butter
  • 1 cup chopped onion
  • 1 1/3 cup chopped celery
  • 1 1/2 cup chopped carrot
  • 2 slices of chopped bacon
  • 1kg ground beef chuck (seasoned with salt and pepper before cooking)
  • Salt
  • Black pepper, freshly ground
  • 2 cups whole milk
  • 1/4 teaspoon nutmeg
  • 2 cup dry white wine
  • 3 cups canned imported Italian plum tomatoes with juice, chopped
  • 2 bay leaves
  • 2 pounds pasta (tossed with 2 Tablespoons of butter when ready)
  • Freshly grated parmigiano-reggiano cheese at the table
On medium heat, add oil, butter, onion, until translucent. Add celery, carrots, cook 2 minutes, stirring, not browning.

Add bacon then meat, break up with fork, and when no pink color is showing, add milk.

Turn down heat to simmer, stirring frequently until milk has evaporated. Add nutmeg.

Add wine, stirring thoroughly. Once wine has completely evaporated, add tomatoes, and simmer on very very low stirring every now and again. If sauce dries out, add 1/2 cup water a time.

Cook for a minimum of 3 hours. I think 4-6 hours is better.

Taste and season with salt, pepper.

Serve over pasta.

bol_traditional (Large)

I had this simmering on low heat for about 6 hours. The resulting bolognese was bursting with flavor and both rich and creamy at the same time. And because we only have 4 people in our household, the leftover bolognese was soooo much better the next day. I will definitely be making this recipe again. :)

Notes:
  • The original recipe doesn't call for bacon, so you can omit this out if you want.


26 December 2009

Pork Belly Confit - Ad-Hoc at Home

My colleague AW at work passed me this recipe from his Ad-Hoc at home book. When I first read it ... I was like.. wtf ?!?! refrigerate in brine for 10hrs... slow cook in lard for 6 hours ... refrigerate in lard for 12 hours.. 1.5kg of lard !!!!!!!

So I went to my local supermarket and filled my shopping basket with 8x 250g blocks of lard (I brought more in case I needed it) and safely made my way back home with all my blocks of lard. And I picked up a 1kg piece of pork belly from my local butcher on the way back. The rest of the herb ingredients I got from my now flourishing herb garden.. :)

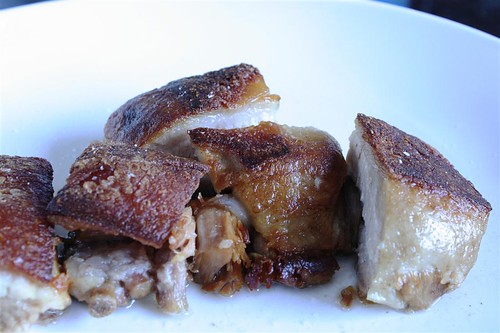
This was the way to consume fat. Every single bite would just melt in your mouth. The way the fat and the meat would just melt into each other. It was pure pork goodness.

pork_belly (Large)

My house smelled of melting lard for the whole 2 days I spent making this. But upon tasting the first piece.. I didn't care anymore. It was well worth it. :)


Pork Belly Confit
recipe from Ad-Hoc at Home by Thomas Keller

Phase 1 - Preparing the Brine:

  • 1/4 cup plus 2 tablespoons honey
  • 12 bay leaves
  • 3 large rosemary sprigs
  • 1/2 bunch thyme (about 10 sprigs)
  • 1/2 bunch (about 10 stems) flat-leaf parsley
  • 1/2 cup garlic cloves (crushed, skin left on)
  • 2 tablespoons black peppercorns
  • 1 cup kosher salt, preferably Diamond Crystal
  • 8 cups water

Combine all the ingredients in a large pot, cover and bring to a boil. Boil for 1 minute, stirring to dissolve the salt. Remove from the heat and cool completely, then chill before using. The brine can be refrigerated for up to 3 days.

002 (Large)
Ingredients for the Brine

Phase 2 - Cooking the Pork:
  • Pork Brine (Cold)
  • 1kg slab pork belly with skin
  • About 6 cups lard
  • Canola Oil
  • Gray salt or coarse sea salt

Pour the brine into a container large enough to hold the pork belly and add the pork, Refrigerate for 10 hours (no longer, or the pork may become too salty)

Remove the pork belly (discard the brine) and rinse under cold water. Pat dry with paper towels, or let air-dry.

Preheat the oven to 90C.

Choose an ovenproof pot, such as a 12-quart Dutch oven, that is only slightly larger than the pork belly and has a lid; the pot should be just large enough that the pork will be surrounded by the lard. Put the belly in the pot and cover with the lard; the lard should cover the pork by 1/2 to 3/4 inch.

Heat the pot over low heat until the lard registers 88C. Cover, transfer to the oven and cook until the pork is meltingly tender; this will probably take 5.5 to 6 hours, but start checking after 4 hours. As the belly cooks, it will lose fat and shrink; it is best to transfer the meat and fat to a smaller pot, always keeping the belly covered by fat. Remove the pot from the oven and let cool to room temperature.

The belly can simply be refrigerated in its fat, but we prefer to press it to compress the internal layers of connective tissue and force out the excess fat, resulting in a better texture and appearance. To press it, transfer it to a deep baking dish. Pour enough fat into the dish to just cover the belly. Cover with plastic wrap, top with a smaller baking dish and weight it down with a brick or large can. Refrigerate for at least 12 hours; reserve the extra fat.

Once it's been pressed, the pork belly can be refrigerated, covered by fat (add some of the reserved fat if necessary), for up to 1 week.

To serve, remove the pot from the refrigerator and let sit in a warm spot to soften the fat for 2 to 3 hours. Your want to soften the fat enough so you can scrape it from the belly while keeping the belly as cold as possible so it will be easier to slice.

006 (Large)
Shot of Pork after scoring the skin

Remove the pork belly from the fat, and wipe off any cooking fat that clings to the meat. Remove the skin and score the fat on the belly in a crosshatch pattern. The belly can be cut into any shape. Slice it or cut it into squares, and let sit at room temperature for 20 to 30 minutes before sauteing. (The fat can be reused to confit pork belly several more times as long as it does not taste too salty. Pour it into a pot and heat gently to liquefy, then strain through a find-mesh conical strainer into storage container. Refrigerate for up to 2 months or freeze for up to 6 months.)

Preheat the oven to 175C

Heat some canola oil in a large oven proof frying pan over medium-high heat just until smoking. Put the pieces of belly fat-side-down in the skillet, reduce the heat to medium-low, and cook until the excess fat is rendered and the fat side is browned, about 18 minutes; pour off excess fat about halfway through the cooking.

When the pork is browned, transfer the pan to the oven to heat through, about 10 minutes. Remove from the oven, sprinkle with gray salt, and serve. We used some Murray river pink salt instead.
016 (Large)
Yummy yummy pork belly ~~!


25 December 2009

Ultimate Beef Burgers

Yay.. Its the 1st day of holidays..Wishing a Merry Christmas and Happy New Year to all !

We made these for lunch while waiting/preparing the other courses for our Christmas dinner.

burger_3 (Large)

Ultimate Beef Burgers
Serves 6

For the beef burgers:
  • 1 small onion (grated)
  • 2 tablespoon Dijon mustard
  • 1 teaspoon salt
  • 1 tablespoon Worcestershire sauce
  • 1/4 teaspoon pepper
  • 1 kg ground beef
Toppings:
  • 6 Cheese slices
  • Pickled Cucumber or Pickled Gherkin
  • Tomato sauce
  • Mustard
  • 6 hamburger bun

Mix together all the ingredients together in a large bowl. Wet hands in some cold water and divide the beef into 6 parts and shape into 6 round patties.

Place on top of some baking paper and place the patties in the fridge for at least 1 hr before cooking.

Place about a tablespoon of oil in a heated saucepan and then add the burgers to the pan. Cook for about 7 minutes on each side.

burger_2 (Large)

About 1 minute left into the cooking, place a slice of cheese on top of the beef patty. And let the cheese melt. Once the cheese starts to melt, remove from the pan then place on top of the burger bun.

Add pickled cucumber or gherkin, mustard and tomato sauce on top of the cheese.

burger_1 (Large)


09 December 2009

Steamed Sea Urchin Egg Custard

This creation is probably a by-product from watching too many episodes of Iron Chef (Japanese version). I picked up a packet of Uni - Sea Urchin at the Sydney Fish Market for $11.50. I used about 1/4 of the packet for the mix sashimi platter that we devoured during the day. And for the remainder, I turned it into a Steamed Sea Urchin Egg Custard, that I had vaguely remember seeing one of the Iron Chefs do. Straining the Uni through a fine sieve and then incorporating it into an steamed egg like custard. This recipe is based off my chinese steamed egg dessert. The only difference is that I added uni, omitted the sugar, used a dashi broth base, added mirin, light soy and used cream instead of milk.

I have had something similar in Japan before, but that was with a whole sea urchin that was steamed with some sort of cream custard. The result was something that was surprisingly light and delicate with the sweet taste of uni.

Steamed Sea Urchin Egg Custard
Serves 2

  • 1 egg
  • 1/3 cup Dashi broth (1 tablespoon of dashi granules with 1/3 cup of hot water)
  • 1 tablespoon of full cream
  • 1/2 pack of sea urchin (strained through a sieve, reserve a couple for decoration).
  • 1/2 tablespoon of Mirin
  • teaspoon of light soy sauce
Method:
  1. In a bowl, beat the egg and combine with the dashi broth and cream. Add the Mirin then the teaspoon of light soy.
  2. Strain the sea urchin through a fine sieve placed on top of the bowl. Discard any stringy parts.
  3. Pass the egg and sea urchin mixture through the fine sieve again.
  4. Bring a wok with some water to boil to be used as a steamer. Place a plate on top of the steaming rack.
  5. Divide the egg and sea urchin mixture between two ramekins.
  6. Remove any foam that may have formed around the rims.
  7. Once the water starts to boil, move the wok to the smallest stove top and keep the heat on the lowest setting.
  8. Cover the ramekins with some glad wrap. Place on top of the plate and steam for about 25 minutes or until the egg custard wobbles when you move the ramekin.
  9. Uncover the glad wrap, and place a couple of the reserved whole sea urchin roe on top of the egg custard.
  10. Cover, turn the heat off and let the ramekins rest for about 3 mins.
  11. Serve immediately.

uni1 (Large)


05 December 2009

Ricotta Stuffed Zucchini Flowers

I'm a sucker for Zucchini flowers.. If they are on the menu, I would order them. No questions asked. Making them however, is a totally different story. Its always been a bit of a mess. The batter goes everywhere. Ricotta stuffing drips out. Or the batter would either be too thick or too thin... blah ~!

I think though.. I may have finely got it right this time. The difference is draining the ricotta cheese beforehand. By doing this, the cheese has more form and makes it easier when transferring from the batter mix into the deep fryer. Also, coating the stuffed zucchini flowers in a thin layer of cornflour before dipping it into the batter mix, helped to keep the batter coating on. The batter mixture itself had to pass the chopstick test. By that I mean, dipping the ends of a chopstick into the mixture, and when you pull out the chopstick, there should be a coating of batter around the ends that doesn't all drip off.

Ricotta Stuffed Zucchini Flowers

  • 6 zucchini flowers
  • 1/2 cup of ricotta cheese (drained)
  • 1 egg
  • 1/3 cup of freshly grated Parmigiano-Reggiano
  • 1 clove of garlic (minced)
  • 5 fresh sweet basil leaves (finely chopped)
  • 1 Anchovy fillet (minced)
  • Couple of grinds of fresh Pepper
  • 1 small chilli (finely chopped) - Optional

For the Batter & Frying

  • Enough vegetable or canola oil for deep frying
  • Enough Cornflour for coating the stuffed flowers
  • 2/3 cup all-purposed flour
  • Teaspoon of Bi-Carbonate of Soda
  • 1/2 cup of icy cold water

For serving

  • Sprinkle of sea salt flakes
  • Lemon Wedges

Method

  1. In a large bowl, mix together the drained ricotta, egg, garlic, basil, cheese, anchovy fillet and fresh pepper. Once the mixure is combined, using a sandwich bag, spoon the ricotta mixture into the bag and set this aside.
  2. Clean each flower by patting it with a damp cloth. Gently spread open the petals of each flower and carefully pinch out the filaments inside.
  3. Using a pair of sissors, snip off one of the corners of the sandwich bag so that it turns into a pipping bag.
  4. With one hand holding the flower and opening flower petal, and the other with the pipping bag, fill up the zucchini flower with the ricotta mixture. You should be able to use the ends of the petal and give it a slight twist to keep the ricotta mixture in place. Lay these down onto a flat tray or plate. Repeat until all the zucchini flowers have been stuffed with the ricotta mixture.
  5. Sprinkle a thin layer of corn flour over the zucchini flowers. Turn each flower and make sure they are evenly covered.
  6. Heat about 1 1/2 inches of oil in a deep saucepan over medium-high heat until its hot enough to start frying.
  7. Mix together the remaining ingredients for the batter mix. Add more water if the batter is too thick. Or more flour if it is too thin.
  8. Once the oil is ready, taking one flower at a time... dip the flower into the batter, turning to coat completely. Lift out and let the excess drip off. Gently slip the battered flowers into the hot oil and fry until golden brown on all sides. This should take about 4 minutes. Using tongs or a slotted spoon, transfer the blossoms to paper towels to drain off any excess oil.
  9. Season with some sea salt flakes and serve immediately with some wedges of lemon.
zucchini (Large)

Tips:

  • You can test this with a piece a small piece of bread. Or simply dip in the ends of a chopstick, and if it starts to bubble around the chopstick, then the oil is ready. It should not be smoking hot. If it is, the food will burn too quickly, turn the heat off to cool the oil until its no longer smoking.