20 January 2010

Anchovy Dressing

I still had a lot of fancy lettuce leftover from making these burgers. The easiest way to use up a lot of lettuce leaves would be to use them up in a salad. I was thinking of a Caesar salad for lunch. That was until I realised the mayo in my fridge had expired about 8 month ago. Oppps... It still looked ok. But I didn't think I should risk it. So it went straight to the bin.

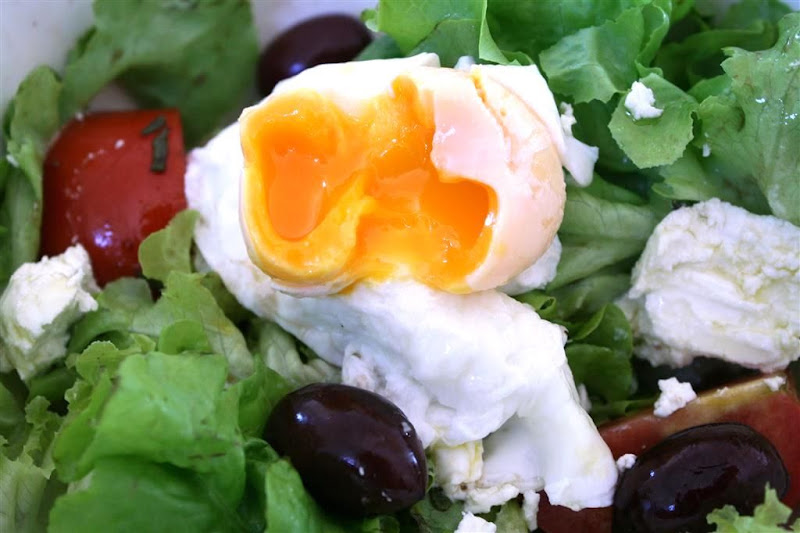
I didn't feel like walking to the shops, and making mayo from scratch seemed a little bit overboard for what was supposed to be a quick Caesar salad. So instead of making a creamy Caesar salad dressing, I ended up putting together this Anchovy dressing instead. I added in capers and balsamic vinegar for some extra tang. The goats cheese actually worked really well with the dressing.

Anchovy Dressing
  • 1 Tablespoon Sage (coarsely chopped)
  • 2 Teaspoons Caper (drained, rinsed)
  • 4 Anchovy Fillets
  • 2 Tablespoons Balsamic Vinegar
  • 2 Tablespoons Olive Oil
  • Couple grinds of freshly ground black pepper
For the Salad:
  • Oak leaf Lettuce (can substitute with any other type of lettuce)
  • Goats cheese
  • Tomatoes
  • Olives
  • Poached Egg
Method:
  1. In a food processor set to pulse and blend together the anchovy fillets, capers and sage.
  2. Scoop out the contents into a bowl and add balsamic vinegar, olive oil and pepper to taste.
  3. Mix to combine well. Set aside.
  4. Prepare the ingredients for the salad. I used whatever was available in my fridge, so feel free to substitute with what you have.
  5. Toss salad with the anchovy dressing. Serve with some extra goats cheese and top with a poached egg.


19 January 2010

HK Style - Swiss Chicken Wings

Swiss Chicken Wings is not actually a "Swiss" recipe. The story goes that a foreigner in Hong Kong asked a waiter what was the name of the chicken wing dish he was eating and the waiter replied 'sweet sweet', but due to the difference in accents the foreigner thought he heard 'swiss swiss'. Hence now the name of Swiss Chicken Wings. This is my take on how to make this dish, which is commonly found in most HK Style cafes.

HK Style - Swiss Chicken Wings
Recipe adapted from afmag

Ingredients:
  • 1kg chicken wings (drumlets separated from wings - you can keep them together if you wish)
  • 1 thumbsized piece of ginger (smashed)
  • 1 star anise
  • 1/2 teaspoon of salt
  • 1/2 teaspoon of asian red chilli powder
  • 2 stalk spring onion (cut into 4cm sections)
  • a splash of sesame oil
Marinade:
  • 1 tablespoon Shaoxing wine
  • pinch of white pepper
Seasoning:
  • 1/2 cup water
  • 1 tablespoon dark soy sauce
  • 3 tablespoon light soy sauce
  • 2/3 slab brown block sugar

Method:
  1. Wash chicken wings. Pat dry. Mix well with marinade ingredients. Marinade for 20 minutes.
  2. Heat up 1 tablespoon oil. Stir-fry ginger slices till fragrant. Add chicken wings. Pan-fry briefly.
  3. Add the red chilli powder, salt, star anise and stir fry the wings to make sure the salt and chilli powder is evenly distributed.
  4. Add seasonings (pre-mixed). Braise over low heat till slab sugar dissolves and chicken wings are done.
  5. Add the spring onion slices to the chicken wings and continue to braise for about 2-3 mins.
  6. Transfer to plate. Sprinkle some sesame oil over the wings. Garnish with extra spring onion slices.
  7. Serve with some steamed rice


18 January 2010

Caramelized Onion, Mushroom and Blue Cheese Sauce


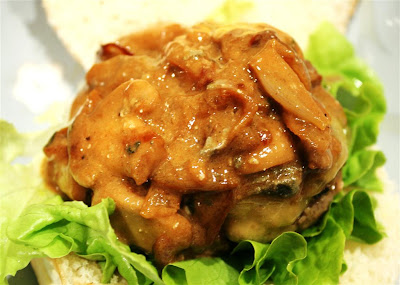
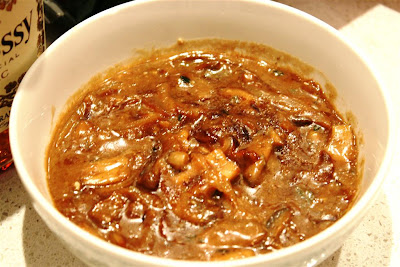
I still have 4 burger patties sitting in the freezer, made from this recipe. We opted for burgers for lunch, but I wanted to try something different from the usual lettuce, pickles, cheese and tomato toppings. I was thinking something along the lines of a mushroom or blue cheese sauce. Since I had both of these ingredients leftover in my fridge. Then I found this.. a recipe for Kobe Burgers with Onions, mushrooms and blue cheese sauce. Perfect. I scaled down the recipe a bit and used it to top my juicy burger.

Let me just say.. the sauce was amazing ! I think its because of the Roquefort, which is a creamy and softer version of blue cheese. So although the sauce did have a blue cheese kick to it.. it was a slightly more subtle kick. Even my 'non-blue-cheese-fan' housemates liked it :)


Caramelized Onion, Mushroom and Blue Cheese Sauce
Enough for about 2-3 Burgers

  • 1 tablespoons butter
  • 1/2 onion (sliced)
  • 1 clove garlic (finely chopped)
  • 1/2 teaspoon thyme (chopped)
  • handful of mushrooms (sliced)
  • salt and pepper to taste
  • 1 splash brandy
  • 1/2 cup beef broth (1/2 cube of beef stock dissolved in 1/2 cup hot water)
  • 1/4 cup blue cheese (crumbled, I used some Roquefort)
Method:
  1. Melt the butter in a pan
  2. Add the onion and saute at medium heat until tender, about 5 minutes.
  3. Add the garlic and thyme and saute until fragrant, about a minute.
  4. Add the sliced mushrooms and season with salt and pepper and saute until tender, about 7-9 minutes.
  5. Add a splash of brandy and deglaze the pan and simmer until it has reduced by half.
  6. Add in the beef stock and simmer until it has reduced by half
  7. Remove from heat and stir in the blue cheese.
  8. Taste sauce and adjust seasoning as required.
  9. Assemble the burger with lightly toasted buns, lettuce, beef patty, caramelized onion and mushroom blue cheese sauce.


14 January 2010

Pork Satay with Peanut Sauce - Daring Cooks Challenge

The Daring Cooks Challenge for January was hosted by Cuppy of Cuppylicious. The recipe she choose was a Thai-inspired Pork Satay from the book 1000 Recipes by Martha Day. The focus of the challenge was with marinating the meat. There was a long and short version for marinating, and I choose to do the long version. Here are the guideliness she set for the challenge:
  1. Use any meat or tofu you like.
  2. Serve satay as an appetizer, side dish or main course.
  3. Skewer or no skewer, your call.
  4. Pan fry, grill, or broil, also your call.
  5. Alternative recipe below for faster marinade.
  6. Alternative recipe below for peanut allergies.
  7. You don’t have to use turmeric if you don’t have it. In the case of satay, turmeric just makes it yellow. Har har.
  8. Marinate (verb) – to steep (to wet thoroughly in or with a liquid; drench; saturate; imbue) in a marinade before cooking.
    The required part of this challenge is to marinate. Marinades serve two purposes, to: 1) add awesome flavor and 2) tenderize tougher meats.

What I like to do is take tougher (cheaper!) cuts of meat and marinate them to make them soft and tender. The tougher the meat, the cheaper it seems to be. Think of it as “what part of the animal gets the most exercise?” and you’ll know which parts are the tough (cheaper!) cuts. Anything from the back and belly tends to be pretty tender already, as it gets very little exercise on the animal (haha… I just patted my own belly thinking about that!).

Meat cuts:
http://www.specialtyfoods.com.au/cuts.html

The key to a great marinade is to have an acid (lemon, lime, brine, soy, vinegar, etc) and an oil (peanut, vegetable, corn, olive, etc). If you’re already working with a soft meat (filet mignon) or vegetable (capsicum) or tofu, then you can skip the oil entirely. Potatoes and tofu still need to be marinated for flavor, otherwise you may as well dip French fries in catsup. If you're going to grill, I suggest you include the oil anyway.

Marinade Info:
http://www.bbqrecipesecrets.com/marinades.html

Things you’ll need for the long version:
Sharp knife
Cutting board
Food processor (optional)
Juicer (optional)
Medium bowl w/ lid or plastic wrap (or ziplock bag)


I used Pork Neck instead of the recommended shoulder or loin cuts. Just because I happen to have about 300g of it left in my freezer. Also I guess fattier pork equals yummier satays.. :)

pork_satay2


Pork Satay with Peanut Sauce

Satay Marinade

  • 1/2 small onion, chopped
  • 2 garlic cloves, crushed
  • 1 T ginger root, chopped (optional) (2 cm cubed)
  • 2 T lemon juice (1 oz or 30 mls)
  • 1 T soy sauce (0.5 oz or 15 mls)
  • 1 tsp ground coriander (5 mls)
  • 1 tsp ground cumin (5 mls)
  • 1/2 tsp ground turmeric (2-2.5 mls)
  • 2 T vegetable oil (or peanut or olive oil) (30 mls)
  • 1 pound of pork (loin or shoulder cuts) (16 oz or 450g)

Feeling the need to make it more Thai? Try adding a dragon chili, an extra tablespoon of ginger root, and 1 tablespoon (0.5 oz or 15 mls) of fish sauce. (I keep some premature (still green) dragon chili peppers in the freezer for just such an occasion.)

Directions:

  1. Cheater alert: If you have a food processor or blender, dump in everything except the pork and blend until smooth. Lacking a food processor, I prefer to chop my onions, garlic and ginger really fine then mix it all together in a medium to large bowl.
  2. Cut pork into 1 inch strips.
  3. Cover pork with marinade. You can place the pork into a bowl, cover/seal and chill, or place the whole lot of it into a ziplock bag, seal and chill.
  4. Cooking Directions (continued): If using wooden or bamboo skewers, soak your skewers in warm water for at least 20 minutes before preparing skewers.
  5. Gently and slowly slide meat strips onto skewers. Discard leftover marinade.*
  6. Broil or grill at 290°C/550° F (or pan fry on medium-high) for 8-10 minutes or until the edges just start to char. Flip and cook another 8-10 minutes.

    * If you’re grilling or broiling, you could definitely brush once with extra marinade when you flip the skewers.

pork_satay1 (Large)


Peanut Sauce

  • 3/4 cup coconut milk (6 oz or 180 mls)
  • 4 Tbsp peanut butter (2 oz or 60 mls) **
  • 1 Tbsp lemon juice (0.5 oz or 15 mls)
  • 1 Tbsp soy sauce (0.5 oz or 15 mls)
  • 1 tsp brown sugar (5 mls)
  • 1/2 tsp ground cumin (2.5 mls)
  • 1/2 tsp ground coriander (2.5 mls)
  • 1-2 dried red chilies, chopped (keep the seeds for heat)

** I didn't have any peanut butter, so added in a handful of crushed peanuts instead.

  1. Mix dry ingredients in a small bowl. Add soy sauce and lemon, mix well.
  2. Over low heat, combine coconut milk, peanut butter and your soy-lemon-seasoning mix. Mix well, stir often.
  3. All you’re doing is melting the peanut butter, so make your peanut sauce after you’ve made everything else in your meal, or make ahead of time and reheat.
satay_sauce2 (Large)

Pepper Dip (optional)

  • 4 tablespoon soy sauce (2 oz or 60 mls)
  • 1 tablespoon lemon juice (0.5 oz or 15 mls)
  • 1 teaspoon brown sugar (5 mls)
  • 1-2 dried red chilies, chopped (keep the seeds for heat)
  • 1 finely chopped green onion (scallion)
Mix well. Serve chilled or room temperature.

Tamarind Dip (optional)
  • 4 tablespoon tamarind paste (helpful link below) (2 oz or 60 mls)
  • 1 tablespoon soy sauce (0.5 oz or 15 mls)
  • 1 clove of garlic, minced
  • 1 finely chopped green onion (scallion)
  • 1 teaspoon brown or white sugar, or to taste (about 5 mls)

Mix well. Serve chilled or room temperature.

Thank you Cuppy for the challenge !
13 January 2010

Pork Buns - Momofuku Pork Belly

These are the Pork Buns we made with the Momofuku Pork Belly...

pork_bun4 (Large)

Pork Buns - Momofuku Pork Belly

  • Hoisin Sauce
  • 1 Cucumber - Cut into 1/8 pieces with the seeds & watery parts removed
  • Couple of Sprigs of Spring onion - White to light green parts only, cut into 5cm pieces
  • Steam Buns - 'Man Tou' from my local Asian grocery store.
  • Momofuku Pork Belly pieces - sliced just over 1cm thick.
Method:
  1. Retrieve the pork belly from the fridge and slice into pieces just over 1cm thick.
  2. Heat up the pork belly pieces in the oven. (about 160C).
  3. While that is heating up, bring a wok with some water to boil and use it as a steamer to cook the Steam buns according to the packet instructions. This should take about 5 mins
  4. Slice the steam buns down the middle, and open up the steam buns.
  5. Place one piece of pork belly with sliced cucumber and spring onion and about 1 teaspoon (or more) of Hoisin Sauce
  6. Close up the bun and consume immediately. :)

pork_bun1 (Large)

There is a recipe for proper steam buns, but I didn't really have the time to do it. Next time..next time I will. :)


Pork Belly - Momofuku

Ok.. I'll admit it. I'm going through a bit of a pork belly phase at the moment. My housemates think that I'm on a vendetta to turn them into the three little piglets.. literally.

After the successful attempt with Ah-Hoc at Home's pork belly confit, I was looking around for something else that not only showed off the pork but also scored high up in the flavor department. Don't get me wrong, the pork belly confit was absolutely amazing. It was pure pork goodness.. :)

But then again, I could only consume 2 pieces of the confit. I really wanted more, but I couldn't do it. I felt like I needed something tangy to help cut into the richness of the pork belly. A bit like how Roast Duck needs plum sauce. After googling for a bit, I found this recipe on Time Out New York from Momofuku. Upon first glance the recipe is a lot simpler than the pork belly confit. I was very surprised that it only used salt and sugar as a dry rub to marinate the pork.

This is the recipe I got from Time Out New York.

We used the pork belly for Pork Buns, but ended up running out of steam buns, so we ended up having the rest with some Chinese egg noodles the next day. I also tried to caramelize it a bit more by sprinkling on a thin layer of sugar before re-heating it back underneath the grill. I will also post up some pictures of the pork buns. :)

momofuku_pork (Large)


Momofuku Pork Belly

MAKES ENOUGH PORK FOR 6 TO 8 BOWLS OF RAMEN OR ABOUT 12 PORK BUNS
  • 1kg slab skinless pork belly
  • 1⁄4 cup kosher salt
  • 1⁄4 cup sugar

The best part of this belly, besides the unctuous, fatty meat itself, which we use in two of our most popular dishes at the restaurants—ramen and pork buns—is the layer that settles at the bottom of the pan after you chill it. Most cooks who are familiar with it know it from making duck confit, and they know it’s liquid gold (or jellied gold, if you want to get technical). We label containers of it “pork jelly.” I add it to broths, to taré, to vegetable sautés—anything that would benefit from a hit of meaty flavor and the glossier mouthfeel the gelatin adds.

To harvest it, decant the fat and juices from the pan you cooked the belly in into a
glass measuring cup or other clear container. Let it cool until the fat separates from the meat juices, which will settle to the bottom. Pour or scoop off the fat and reserve it for cooking. Save the juices, which will turn to a ready-to-use meat jelly after a couple of hours in the fridge. The meat jelly will keep for 1 week in the refrigerator or indefinitely in the freezer.

We get pork belly without the skin. If you can only find skin-on belly, don’t fret. If the meat is cold and your knife is sharp, the skin is a cinch to slice off. And you can save it to make the Chicharrón (page 231) we serve as a first bite at Momofuku Ko.

  1. Nestle the belly into a roasting pan or other oven-safe vessel that holds it snugly. Mix together the salt and sugar in a small bowl and rub the mix all over the meat; discard any excess salt-and-sugar mixture. Cover the container with plastic wrap and put it into the fridge for at least 6 hours, but no longer than 24.
  2. Heat the oven to 220ºC.
  3. Discard any liquid that accumulated in the container. Put the belly in the oven, fat side up, and cook for 1 hour, basting it with the rendered fat at the halfway point, until it’s an appetizing golden brown.
  4. Turn the oven temperature down to 120ºC and cook for another 1 hour to 1 hour 15 minutes, until the belly is tender—it shouldn’t be falling apart, but it should have a down pillow–like yield to a firm finger poke. Remove the pan from the oven and transfer the belly to a plate. Decant the fat and the meat juices from the pan and reserve (see the headnote). Allow the belly to cool slightly.
  5. When it’s cool enough to handle, wrap the belly in plastic wrap or aluminum foil and put it in the fridge until it’s thoroughly chilled and firm. (You can skip this step if you’re pressed for time, but the only way to get neat, nice-looking slices is to chill the belly thoroughly before slicing it.)
  6. Cut the pork belly into 1⁄2-inch-thick slices that are about 2 inches long. Warm them for serving in a pan over medium heat, just for a minute or two, until they are jiggly soft and heated through. Use at once. pork belly for ramen, pork buns & just about anything else

12 January 2010

Fried Chicken - Momofuku

After putting together the Octo Vinaigrette, I had to make some of Momofuku's Fried Chicken to go with it. What I didn't know was that it had to be first submerged in brine (I did it for 3 hours), steamed and then cooled and refrigerated for at least 2 hr (I kept it overnight..since it was too late to have as dinner already) and then deep fried ..!! Luckily the Octo Vinaigrette can be kept in the fridge for up to 5 days. We ended up having the fried chicken and Octo vinaigrette the next day. :)

After P tried it, he said it was like 'Shandong Chicken'.. A rather common Cantonese dish found at most Chinese restaurants.

Over 18 hrs of preparation and waiting for 'Shandong Chicken' ?!?!??!

After trying it, I had to admit I had made something very similar to Shandong chicken. A much more glorified version though. Still the chicken wasn't dry at all, which is a common occurrence with most of the Shandong chicken I've tried at the restaurants.

The recipe asks to take the chicken out of the fridge at least 30 minutes before you want to cook them. Then fry the chicken in 180C oil for about 6-8 minutes. Since the chicken is already cooked, you really only need to fry until the skin reaches your desired level of crispiness. Remove the chicken from the oil and drain them on a rack or paper towels. Before serving toss the chicken in the Octo Vin and garnish with sliced green onions.

Momofuku Fried Chicken
Recipe from Time Out New York

For the Brine:

  • 4 cups lukewarm water
  • 1⁄2 cup sugar
  • 1⁄2 cup kosher salt

For Chicken:

  • 1 medium sized chicken (cut into 8 pieces, wings separated from the breasts)
  • 4 cups grapeseed or other neutral cooking oil
  • About 1⁄2 cup Octo Vinaigrette

Method:

  1. Combine the water, sugar, and salt in a large container with a lid or a large freezer bag, and stir until the sugar and salt dissolve. Add the chicken to the brine, cover or seal, and refrigerate for at least 1 hour and no more than 6. - I did this for 3 hrs
  2. Set up a steamer on the stove. Drain the chicken and discard the brine. Put the chicken in the steamer basket (if you are using a stacking Chinese-style bamboo steamer, put the legs in the bottom level and the breast on the top). Turn the heat to medium and set the lid of the steamer ever so slightly ajar. Steam the chicken for 40 minutes, then remove it from the steamer and put it on a cooling rack to cool. Chill it in the refrigerator, preferably on the rack, for at least 2 hours or overnight.
  3. Take the chicken out of the refrigerator at least 30 minutes before you fry it.
  4. In a deep skillet, heat enough oil for the chicken to be submerged to 180ºC. Fry the chicken in batches, turning once, until the skin is deep brown and crisp, 6 to 8 minutes. Remove to a paper towel–lined plate to drain.
  5. Cut the chicken into a few pieces: cut the wing from the breast, cut the breast in half, cut through the knee to separate the thigh from the drumstick. Put in a large bowl, toss with the vinaigrette, and serve hot.

fried_chick (Large)

11 January 2010

Octo Vinaigrette - Momofuku

Octo Vinaigrette... When I first saw this, I thought.. 'Oh.. an eight ingredient vinaigrette ?' Turns out I was wrong, it was a vinaigrette for octopus. But it also works well on most meats including fried chicken.

I've made similar vinaigrettes before for duck salads with soy sauce, lime juice, chilli, spring onion and coriander. This Vinaigrette uses rice wine vinegar instead and does not call for any spring onions or coriander. So I was pleasantly surprised with the depth of flavors when I tasted it. This is definitely one vinaigrette I will be making again. :)


Octo Vinaigrette
From Time Out New York - Makes about 1 Cup

From Kevin Pemoulie, creator of this vinaigrette, one of the world’s finest condiments and food-improvers—a sauce so good it makes anything taste better: So, the “octo vin” is how she’s formally known. I think of it as an interesting flip-flop of a traditional vinaigrette in that the ratio of vinegar to oil is reversed. It’s designed to hold up to the char of the octopus and to dress the seaweed, which, unlike lettuces, requires a very forceful, pungent sauce. I wish my prom date had worn a pungent dress. If we used this to dress a salad, it would probably be too strong. However, it is really fucking delish with meats: grilled or fried. We served it once with whole fried sole. We’ve served it with grilled hamachi collar. And, obviously, the Fried Chicken (page 89).

Ingredients:
  • 2 tablespoons garlic (finely chopped)
  • 2 tablespoons ginger (finely chopped)
  • 1 fresh bird’s eye-chilli (seeded and chopped)
  • 1⁄4 cup rice wine vinegar
  • 1⁄4 cup light soy sauce
  • 2 tablespoons grapeseed or other neutral oil
  • 1⁄4 teaspoon Asian sesame oil
  • 1 1⁄2 tablespoons sugar
  • Freshly ground black pepper
Method:
  1. Combine the garlic, ginger, chilli, vinegar, soy, grapeseed oil, sesame oil, sugar, and a few turns of black pepper in a lidded container and shake well to mix. This will keep in the fridge for 4 to 5 days.
NOTE :
  • When preparing the garlic and ginger for this recipe, make sure to take your time and work your knife skills: small, even pieces of garlic and ginger (not the mush that a garlic press or a ginger grater creates) really make a difference. Big bits of raw garlic can have an acrid sting; chunks of ginger will deliver a too-spicy blast and can be unpleasantly fibrous.


10 January 2010

Onsen Tamago - Hot Spring Eggs

I stumbled upon this recipe when I was googling around for something completely different. Well.. probably not totally different, or else google wouldn't have returned this as part of its search results .. albeit way down in about the 4th page of results.

By the way, I was searching for silky tofu japanese recipes. And one of the returns was a recipe for Onsen Tamago.. at home. I've had this before when I was travelling around in Japan. So the thought of being able to reproduce this as home got me interested.

To put it simply, Onsen Tamago is an egg disk that is commonly served as a breakfast item at the accommodations around the hot springs in Japan. The reason being that the temperatures of the hot springs are perfect for poaching these eggs over a long period of time. The resulting egg is so delicate and silky that it just slides down your throat. The eggs are poached inside it's shells until the yolks are set on the outside, but the whites are still only loosely set and creamy.

Which.. if you explore the physics of eggs, I remember reading somewhere that egg white begins to set at 63C, while egg yolk begins to set at 65C. Which means that the egg had to be poached at about 64C constantly so that the whites so not completely set and go hard. Afterall, I'm not looking to make a hard boiled egg here.

Quite the opposite.. Think Joël Robuchon's Egg Cocotte. But a more simplified.. Asian version.

So.. back to the recipe. The amusing part about this was that you use a rice cooker to simulate the cooking phase from the hot springs. Apparently, when the rice has finished cooking, the rice cooker will automatically switch to the handy ‘keep warm’ setting – which coincidentally maintains the a similar temperature for making onsen tamago. All you need to do then is wrap the egg in a layer of kitchen paper (this is just to make sure the eggs aren’t heated directly) and set it gently on top of the cooked rice. Cover, and leave to ‘cook’ for one hour.


onsen tamago


Onsen Tamago - Hot Spring Eggs
Recipe adapted fromTastyTreats - Serves 4
  • 4 eggs
  • Kitchen paper
  • 1 sprig spring onion (finely sliced)
  • couple of coriander leaves
Dashi Broth:
  • 1/2 cup of hot water
  • 1 tablespoon of dashi broth granules
  • 1 tablespoon Mirin
  • 1 1/2 tablespoon light soy sauce
Method:
  1. Dissolved the dashi broth granules in 1/2 cup of hot water, add in mirin and light soy sauce. Mix until its all combined together and leave to chill in the fridge until needed.
  2. For the Eggs: Run them under warm water if you take them straight out of the fridge and want to use immediately. With a rice cooker that’s just finished cooking some rice and is on the 'keep warm' setting, get some kitchen paper and wrap each egg individually.
  3. Place into the rice cooker to cook for 45mins.
  4. When time’s up, gently crack your egg open and let it slide into the dashi mixture you’ve made in advance. Sprinkle over some chopped spring onions and coriander leaves.

onsen tamago2

I put a piece of steamed tofu into each of the dashi broth bowls as well. Remember..? I was originally looking for a silken tofu recipe so I can use up my tofu somehow. Given the similar texture, they actually worked pretty well together in the dashi broth. :)


09 January 2010

Oven Baked Dijon Potatoes

We opted for Charcoal BBQ chicken from our local for dinner last night. I think their Charcoal BBQ chicken is one of the better ones in Sydney. However, their chips are just the plain old frozen ones that goes straight from the bag into the oil. Sigh.. If only they do hand-cut chips... then that would be perfect !

So I put these together instead.

The dijon mustard mixture gives the potatoes a light, tangy edge thats makes me able to consume more than my usual carbohydrate intake.

The mustard also keeps these babies from getting too brown as the potatoes cook, and also keeps them very moist.... And did I mention a rather tasty coating !? :)

Oven Baked Dijon Potatoes
Serves 2
  • 2 - 3 potatoes (washed, cut into 1 inch cubes)
  • 1 tablespoon Dijon mustard
  • 2 tablespoon olive oil
  • 1 tablespoon fresh rosemary (finely chopped)
  • 1 clove garlic (unpeeled, smashed)
  • Salt & Pepper to taste
Method:
  1. Cut potatoes into 1 inch cubes. Leave the skin on.
  2. Smash the garlic with the flat side of a knife. Combine with the remaining ingredients into medium bowl and mix well.
  3. Add potatoes and toss well to coat. Add a couple of grinds of salt and pepper.
  4. Place potatoes in the oven on a baking dish and bake at 200C for about 35 minutes.
  5. You should be able to easily insert a knife into one of the potato cubes when they are done.
  6. Discard the garlic clove.

baked_potatoes (Large)

08 January 2010

Thai Style Cucumber Relish

Work has been pretty busy for the past week. So by the time I get home, the only thing I could really put together were some quick dishes to have with some steam rice with either roast chicken or duck from the shops.

This recipe is really easy and quick to make and goes well as an accompliment to roast duck, deep fried chicken wings, thai fish cakes and thai-styled satays.

Thai Style Cucumber Relish
recipe adapted from David Thompson's Book - Thai Street Food
  • 1/4 cup white sugar
  • 1/4 cup white vinegar
  • 1/4 cup water
  • pinch of salt
  • 1 cucumber (quartered & sliced)
  • 4 red shallots (finely sliced)
  • 1/4 red chilli (chopped)
  • 2 tablespoons Coriander (chopped)
Method:
  1. Simmer the sugar, vinegar, salt and 1/4 cup of water. When the sugar has dissolved, take off the heat and allow to cool.
  2. Put the cucumber, chilli, shallots and coriander into a bowl. Mix together with the sugar & vinegar solution and serve as an accompliment for satays or Thai fish cake.

cucumber relish (Large)

06 January 2010

Tsukune - Japanese Chicken Meatballs

If you've been to an Izakaya joint in Japan, then you'll know why I'm such a sucker for these mince chicken meatballs. For those who haven't.. An Izakaya is a type of 'Japanese Drinking Establishment' which serves all sorts of tapas style food to accompany the drinks. If I remember correctly, these chicken meatballs are usually found at the BBQ skewers or Yakitori section of the menu. And they are absolutely delicious. :)

This is my first attempt at replicating these. I managed to find a few reference recipes online, but as always.. its hard to find authentic japanese recipes written in english. I was actually pretty pleased with the end result, as it actually tasted quite similar to what I remember having in Japan.

After mincing and putting all the ingredients together in my Magimix food processor aka Petals, I found the mixture to be quite flimsy. I had already added some cornflour to help the mince meat stick together. But I wasn't sure if the chicken mixture would be able to hold it's 'meatball' shape when I grilled it. So instead of throwing them straight on a grill pan, I decided to put them in some boiling water so that the outer 'meatball' shell is formed first.

Thats about when I stumbled upon this recipe from Rasa Malaysia and realised the author also boiled the meatballs prior to grilling them. Her yakitori sauce also made a bit more food sense. I had run out of ginger at home, so that may account for the slight discrepancy in taste. The next time I make these, I'll definitely try with some ginger.

Tsukune - Japanese Chicken Meatballs
Recipe adapted from Rasa Malaysia

For the Chicken:
  • 300g chicken mince
  • 1 cup chopped spring onion
  • 2 cloves garlic
  • 1 egg
  • 1 tablespoon sesame oil
  • 1 teaspoon sugar
  • 1 teaspoon light soy sauce
  • 1 teapsoon salt
  • 1/4 teaspoon white pepper
  • 1/2 teaspoon cornflour

Additional Items:

  • Skewers (soaked in water for at least 30 mins)
  • Water
  • tablespoon salt

Yakitori Basting Sauce:

  • 4 tablespoons sake
  • 5 tablespoons light soy sauce
  • 1 tablespoon mirin
  • 1 tablespoon sugar
  • 1/2 teaspoon corn starch blended with 1 teaspoon water

Method:

  1. Blend the spring onions and garlic into the food processor
  2. Using the bigger bowl in the food processor, mince the chicken, then added processed spring onions and garlic and combine well.
  3. Add egg and the rest of the seasoning ingredients to the chicken mince. Mix until all the ingredients are combined.
  4. Wet your hands and scoop about a tablespoonful of the mixture into your palm. Shape it into a small ball about the size of a golf ball.
  5. Bring a saucepan of water with about a tablespoon of salt to boil
  6. Add the chicken balls and boil for about 7 minutes, or until the color of the meat changes and the balls float to the surface. Scoop out and drain on a plate covered with paper towels.
  7. In a small pan, mix all the ingredients for the yakitori sauce, except for the corn starch solution. Bring the mixture to boil, and then reduce the heat and simmer for about 5 minutes or until the sauce slightly reduced. Add the corn starch solution and stir until the sauce is thickened. Transfer to a small bowl.
  8. Thread 3-4 balls on to each bamboo skewer. Grill the skewers on a grill pan. Brush them with the yakitori sauce and turn the skewers frequently until the balls turn brown.
  9. Serve while its hot with a wedge of lemon. Sprinkle with shichimi togarashi (Japanese chile powder with sesame seeds) and some yakitori sauce if you like.

tsukune (Large)


Related Posts with Thumbnails