Showing posts with label Side Dishes. Show all posts

12 April 2010

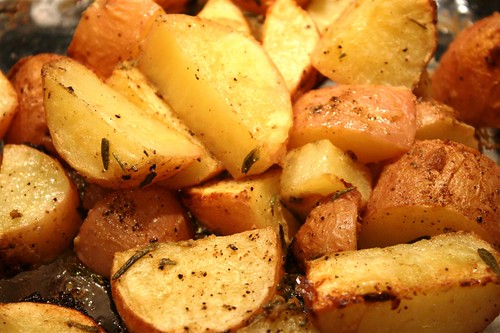
Duck Fat Potatoes (2) - Pommes de Terre Sarladaise

If you can recall, I still have close to 1/2 kg of duck fat sitting in my freezer. Apart from duck fat potatoes I haven't really ventured into anything else with the duck fat yet. One of these days when I do have time to spare, I will try to tackle the duck confit. But not now.

I actually think this method is better than the way I was making them before (which is why I'm reposting this).

You might be thinking.. Its duck fat potatoes... can they really go wrong ?! Well no. You can't. But after several tries on different versions (all of which were extremely tasty), there was one standout recipe.

Well... Crispy coating. Soft fluffy interior. :)

So here is another take on Duck Fat Potatoes.


Duck Fat Potatoes (2) - Pommes de Terre Sarladaise
  • 3-4 Red Skinned Potatoes (peeled - cut into rough chunks)
  • 2 Cloves Garlic (Crushed with the flat side of the blade, skin left on)
  • 8-10cm Sprig Rosemary
  • 3 tablespoons Duck Fat
  • 1/2 teaspoon Salt
  • Freshly grounded Black Pepper and sea salt for seasoning
Method:
  1. Bring a large deep saucepan with water to boil add the 1/2 teaspoon of salt.
  2. Place the peeled and cut up potatoes into the water, bring to boil and reduce heat and let simmer for about 15 mins. Or until the edges potatoes start to soften.
  3. Pre-heat oven to 180C with a tray lined with a piece of baking sheet.
  4. Once the potatoes are done, drain them and give them a quick jiggle in the colander to rough up the edges a bit
  5. Using a pan, melt the duck fat and add in the crushed garlic and rosemary sprig.
  6. Add in the drained potatoes and toss the potatoes around until they are covered in the duck fat.
  7. Carefully remove tray from the oven.
  8. Transfer potatoes, fat, garlic and rosemary on to the baking sheet lined tray and place back into the oven. Cook for 35-40 minutes or until potatoes turn golden brown.
  9. Remove from oven and season with some freshly ground black pepper and sea salt flakes.


08 March 2010

Fresh Tomato Salsa

Beef burgers has kinda become a fortnightly weekend event in our household. We still try to come up with different accompaniments to have with our burgers. We did the blue cheese sauce before. This time I was thinking of something fresh but still with a bit of bite. So instead of just adding a few slices of tomato and onion to the burger as the salad section, we ended up making some fresh tomato salsa to go as a topping to our beef burgers. The salsa really does take the burgers to a totally different dimension.

Fresh Tomato Salsa
  • 4 ripe tomatoes (diced)
  • 1 jalapeño chilli (leave the white ribs and seeds if you want it hotter, otherwise remove them, finely sliced) - Omit if you are not a chilli fan.
  • ½ cup Onion (diced)
  • One garlic clove (finely minced)
  • ¼ cup spring onion (finely sliced)
  • ¼ cup fresh coriander leaves and stems (stems finely sliced, leaves roughly chopped)
  • ½ teaspoon sea salt
  • fresh ground pepper
  • Juice of 1 lime
Method:
  1. Place the diced tomatoes tossed with a pinch of salt into a colander over the sink (or bowl) and let drain for 20~30 minutes.
  2. Discard the juice and transfer tomato to the bowl. Add the rest of the ingredients and stir to combine. For more heat, include both the ribs and seed of the chillies.
  3. Taste and adjust the flavour with lime juice, salt and pepper. If the salsa becomes a bit too acidic, add a little sprinkle of sugar to balance things out.
  4. The fresh salsa should be covered, and placed in refrigerator to rest for 30 minutes. Doing this will allow the ingredients to bind together, creating a more intense and well-incorporated flavour.

Beef burger with a dollop of salsa on a not-so-lightly-buttered-bun.. :)

06 March 2010

Beef Tataki with Ponzu Sauce

Every fortnight, a few of my foodie colleagues and myself get together for dinner and try out a restaurant. We actually put a list together on google wave of about 18 different places that finishes with Tetsuya. It's with this group that we also try to do a monthly cookingfest at one of our places. The last time I went, I made the pork belly confit (yes.. that means I had the pork belly confit twice). The theme this time is small dishes that goes with sake. I thought I'll stick with a lighter dish this time round, so went with the beef tataki with ponzu sauce and some tsukune chicken meatballs.

The term tataki refers to meat (usually beef or fish) that has been marinated, seared, then chilled and thinly sliced to serve. This is something we always end up ordering at a Japanese restaurant. So was nice to learn how to make it at home.


Beef Tataki with Ponzu Sauce
  • 300g high quality beef fillet (trimmed of fat)
  • 1/2 cup Japanese light soy sauce
  • 1/4 cup mirin
  • 1 tablespoon unseasoned rice vinegar
Garnish
  • 1 stalk Spring onion (green & white part, finally sliced)
  • 1 teaspoon fresh Ginger (peeled, grated through a microplane grater to remove the fibrous parts)
  • 1 teaspoon fresh Daikon Radish (peeled, finely grated through a microplane grater).
Additional items required:
  • Ice cubes
  • Clingwrap
Method:
  1. In a Pyrex or ceramic bowl, mix soy sauce, mirin and rice vinegar. Place beef fillet in bowl and turn several times to coat all sides of beef in marinade. Cover with plastic wrap and place in refrigerator for 20 minutes, flipping the beef over after 10 minutes.
  2. Remove beef from marinade and pat dry with a clean kitchen towel. Discard marinade.
  3. Prepare a bowl large enough to completely submerge your beef with an ice bath. Fill it 1/2 way with some ice and set aside.
  4. Heat a heavy-duty saucepan over high heat. Add just enough cooking oil, about 1 tablespoon, to keep beef from sticking to the pan.
  5. Place beef in pan and quickly sear each side until lightly browned, about 15-20 seconds.
  6. When all sides have been seared, remove from pan and wrap with some clingwrap before plunging the beef into the ice bath to stop the cooking process. Wrapping the beef in the clingwrap before tossing it into the ice bath means that the meat wont come into contact with the water and therefore wont dilute the taste.
  7. To serve, cut across the grain into the thinnest possible slices possible with a very sharp knife. Lightly tap each piece a few times with the blade of the knife to score, being careful not to cut all the way through.
  8. Fan the slices, overlapping, on a platter and let stand for 10 minutes. Drizzle with the Ponzu sauce and serve. Garish with some finely sliced spring onions and some grated ginger and daikon radish on the side.

my tower of beef tataki.. :)
Notes:
  • If you're not confident about getting really thin slices with the beef, about 45 minutes before you plan to serve, place the clingwrapped beef in the freezer (this will firm the beef and make it easier to cut even slices).


18 February 2010

Duck Fat Potatoes - Pommes de Terre Sarladaise

This sign at my local butcher caught my eyes... Duck Fat $14/kg.

A kilo of duck fat. I wasn't exactly sure what I should do with 1 kilo of duck fat, so I asked if I could have 1/2 kg instead. And they happily obliged.

Hummm.. Roasted potatoes cooked in duck fat. Sounds soooo wrong... Yet so right :)

I didn't really know how much I would need, but 1/2 kg would surely be enough. After I spent a couple of minutes on Google, I realised I would probably only need about 3 tablespoons.

Crap...Now what am I going to do with 1/2kg minus 3 tablespoons of duck fat ????

I decided to try a slightly different method with the potatoes. Instead of parboiling them first and then roasting them in the duck fat later, I sliced the potatoes into thick 1cm chips and tossed them in a skillet pan with the duck fat, garlic and rosemary before finishing them off in the oven.

Let me just say... These were good.. Very good. A perfect side dish for our steaks.. :)

Duck Fat Potatoes - Pommes de Terre Sarladaise
Adapted from this recipe on Gourmet.com
  • 2 Cloves Garlic (Bruised with the flat side of the blade, skin left on)
  • 8-10cm Sprig Rosemary
  • 3 Red Skinned Potatoes
  • 3 tablespoons Duck Fat
  • 1/4 teaspoon Salt
  • Freshly grounded Black Pepper

Method:
  1. Preheat oven to 180C
  2. Wash the potatoes, removing any dirt.
  3. Leaving the skin on, slice potatoes into 1cm-thick slices.
  4. Rinse in 2 or 3 changes of cold water until water runs clear. Drain and pat with a paper towel until potatoes are very dry.
  5. Heat the duck fat in a nonstick skillet pan over medium heat until melted.
  6. Add in the garlic and rosemary
  7. Toss in the potatoes with about 1/2 teaspoon of salt. Toss and turn the potatoes gently, until they are all coated with fat.
  8. Pour the contents of the pan into a oven baking dish and place into the oven for 20-25 mins.
  9. The potatoes should be golden in colour with a slightly crispy outer layer when done.


09 January 2010

Oven Baked Dijon Potatoes

We opted for Charcoal BBQ chicken from our local for dinner last night. I think their Charcoal BBQ chicken is one of the better ones in Sydney. However, their chips are just the plain old frozen ones that goes straight from the bag into the oil. Sigh.. If only they do hand-cut chips... then that would be perfect !

So I put these together instead.

The dijon mustard mixture gives the potatoes a light, tangy edge thats makes me able to consume more than my usual carbohydrate intake.

The mustard also keeps these babies from getting too brown as the potatoes cook, and also keeps them very moist.... And did I mention a rather tasty coating !? :)

Oven Baked Dijon Potatoes
Serves 2
  • 2 - 3 potatoes (washed, cut into 1 inch cubes)
  • 1 tablespoon Dijon mustard
  • 2 tablespoon olive oil
  • 1 tablespoon fresh rosemary (finely chopped)
  • 1 clove garlic (unpeeled, smashed)
  • Salt & Pepper to taste
Method:
  1. Cut potatoes into 1 inch cubes. Leave the skin on.
  2. Smash the garlic with the flat side of a knife. Combine with the remaining ingredients into medium bowl and mix well.
  3. Add potatoes and toss well to coat. Add a couple of grinds of salt and pepper.
  4. Place potatoes in the oven on a baking dish and bake at 200C for about 35 minutes.
  5. You should be able to easily insert a knife into one of the potato cubes when they are done.
  6. Discard the garlic clove.

baked_potatoes (Large)

08 January 2010

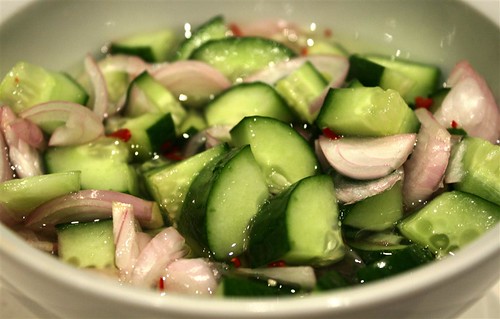
Thai Style Cucumber Relish

Work has been pretty busy for the past week. So by the time I get home, the only thing I could really put together were some quick dishes to have with some steam rice with either roast chicken or duck from the shops.

This recipe is really easy and quick to make and goes well as an accompliment to roast duck, deep fried chicken wings, thai fish cakes and thai-styled satays.

Thai Style Cucumber Relish
recipe adapted from David Thompson's Book - Thai Street Food
  • 1/4 cup white sugar
  • 1/4 cup white vinegar
  • 1/4 cup water
  • pinch of salt
  • 1 cucumber (quartered & sliced)
  • 4 red shallots (finely sliced)
  • 1/4 red chilli (chopped)
  • 2 tablespoons Coriander (chopped)
Method:
  1. Simmer the sugar, vinegar, salt and 1/4 cup of water. When the sugar has dissolved, take off the heat and allow to cool.
  2. Put the cucumber, chilli, shallots and coriander into a bowl. Mix together with the sugar & vinegar solution and serve as an accompliment for satays or Thai fish cake.

cucumber relish (Large)

15 September 2009

Thai Cucumber Salad - Yum Tang Gwa

My lovely cousin is in town this week. While we were out at dinner last night, we were talking about the things she missed most while working abroad. A nice home-cooked meal was something that was mentioned. So I asked her what type of food did she feel like having and if she was free to come over to dinner tonight. She replied .. "Yes... Thai food please".

Darn.. She picked the one cuisine that we probably make the least at home.

Cantonese, Italian, Steak, Casseroles and Japanese type cuisine dishes would be what we usually stick with.

But, alas.. Thai it was. I opted for my Thai Chilli Mussels (just because it was a work day, and its simple enough to whip up in a flash), I did add more liquid and coconut cream so it also doubled as a soup. I made a pot of Green Curry Chicken (full recipe to come later) and a Thai Cucumber Salad as a side dish to help offset the fullness of the coconut milk in the other dishes.

This is based on a recipe I found on Chez Pim's site. I changed it slightly to just stir frying the shallots and sprinkling in some already fried shallots I had in my pantry instead. I also drained some of the water out of the cucumber by tossing some salt through it. And added some lime zest to give it a bit more zing. :)


Thai cucumber salad - Yum Tang Gwa
Original recipe from Chez Pim - Thai Cucumber Salad

  • 2 large cucumbers (peeled then sliced thinly)
  • 1/2 teaspoon salt
  • 1/4 cup of mint (roughly ripped by hand)
  • 1/4 cup of basil leaves (roughly ripped by hand)
  • 1/4 cup coriander leaves
  • 1 cup of shallots (thinly sliced)
  • 2 tablespoons desiccated coconut
  • sprinkle of dried fried shallots

For the dressing

  • 1/4 cup fish sauce
  • 3 tablespoons lime juice
  • Grated lime zest of 1 lime
  • 2 tablespoon rice vinegar
  • 2 tablespoon of palm sugar
  • 2 red chillies (finely chopped) <-- You can add more if you like.

Method:

  1. Peel and cut the cucumbers into thin slices.
  2. Toss the cucumber in some salt, and let stand for 30 mins or so in a colander.
  3. Place a pan over low heat, add the coconut flakes and stir constantly until they are evenly brown. Set aside.
  4. Wipe the pan clean, add some oil into it and place it over medium heat. When the oil is hot, add the shallot slices and stir fry, stirring occasionally, until it starts to turn golden brown. Remove from the pan and set aside.
  5. To make the dressing, first you nuke the palm sugar (in a bowl in the microwave) for 20-30 seconds just to melt it and make it easier to blend with the other ingredients. Then add the fish sauce, stir to blend. Add the lime juice, zest, then the rice vinegar. Taste it and see if you need more acidity, if so, add more rice vinegar to taste. Add the chopped chilli
  6. In a salad bowl, add the cucumber slices. Reserve a bit of the coconut, and the herbs for garnish. Dump the rest into the salad bowl. Pour in about 2/3 of the dressing, toss well.
  7. Taste it and see if you'd like a bit more dressing, then add more as needed. Sprinkle with the fried shallots, coconut, and herbs and serve.

Notes:

  • Due to time constraints, I didn't bother with deseeding the cucumber before slicing it. In retrospect, the next time I make this again, I will probably take the time to deseed the cucumber.

31 August 2009

Grilled Eggplant with Miso Sauce - Nasu Dengaku

This is a healthy, nice and easy snack or side dish to make if you manage to get your hands on some eggplants. If you have the thin & long version, then you will need at least 4-6 eggplants. Eggplants is probably the only vegetable that you cannot under cook. With this recipe, I first grill the eggplant pieces until they are nearly done, then I brush on the miso sauce, and place the eggplants under the broiler (in the middle of the oven - so the miso sauce doesn't burn too easily) for about 5-10 mins. Until at least the miso sauce has start to bubble and brown just a bit. I also find that if I soak the sliced & scored eggplant in some cold water for about 1 hr beforehand, then it retains its white fleshy colour. Even after grilling. :)

Eggplants on the Grill Pan


Grilled Eggplant with Miso Sauce - Nasu Dengaku

For Eggplants:

  • 2 big round eggplants (cut into halves & score a criss-cross pattern across the eggplant)
  • vegetable oil for brushing
  • sprinkle of sesame seeds

For Miso Sauce:

  • 1/2 cup dashi (I mixed 1 tablespoon of dashi granules in 1/2 cup of boiling hot water).
  • 2 tablespoon sugar
  • 2 tablespoon mirin
  • 2 tablespoon sake
  • 1/3 cup of miso paste
  • 2 teaspoons corn starch

Method:

  1. To prepare the miso sauce, place all the content into a measuring cup (except the hot water). Mix to combine it together (the sake and mirin should help thin out the miso paste), then pour in about 1/2 cup of boiling hot water (the water line should come up to the 1 Cup mark now). Continuing mixing until all the contents have dissolved into the hot water, making a slightly thick sauce.
  2. To prepare the eggplants, slice them in half lengthwise and then using a knife score a criss-cross pattern into them. This helps with cooking and to retain the sauce.
  3. Brush the eggplants with some oil and place on a grill pan to grill until the eggplant is cooked. This should take about 5 mins on each side, and the eggplant should be soft to touch when cooked through. Remove eggplants from the grill pan and place into a foil-lined baking tray.
  4. Start the oven in 'grill' mode.
  5. On the criss-cross sides, brush a thick coating of the miso sauce then sprinkle with sesame seeds over the top of the sauce.
  6. Place the eggplants on the middle tray section of the oven, with the grill setting to get the miso sauce to caramelise a bit. This should take about 5-10 mins.
  7. Remove eggplants from oven when you see the miso sauce start to bubble and start to turn brown.


Notes:

  • If you aren't using dashi granules, then you will need to place the dashi broth and the rest of the ingredients in a saucepan and heat it up until the contents dissolve and start to thicken.
  • When grilling the eggplant in the oven, try to keep an eye on the eggplants as the sugar content in the sauce makes the sauce burn rather easily.
  • I find that placing the eggplants in the middle section (instead of directly under the broiler\grill) helps cook the eggplants for a bit more as the sauce is able to caramelise slower.

06 August 2009

Cauliflower Cheese

Making this cauliflower cheese reminds me of the time my grandma used to take us out to this old-style cafeteria around the Aherns department store in Perth. And we would have pork roasts with veggies and Crème caramels for lunch. Yes, for lunch.. Dinner was always back at home and was always chinese food. So every time my grandma would suggest going to Aherns for shopping, we would always tag along.

I guess pork roasts with crackling, 3 vegs and crème caramels doesn't seem to be much. But for someone that just has chinese food all day... any break from that... is a much welcomed break. :)

The 3 vegs would always be mashed potatoes, roast pumpkin and cauliflower cheese.

I would mix the mashed potatoes and pumpkin up with the gravy. But the cauliflower cheese was always satisfying just by itself.... :)

The secret is in the extra thick belchamel sauce and not to overcook the cauliflower so that it doesn't completely fall apart when you pick it up with your fork.

This is my version of a more 'spiced up' cauliflower cheese, with the addition of anchovies, mustard and garlic into the bechamel sauce.

Cauliflower Cheese

Ingredients:

  • 1/2 head of white cauliflower (steam removed, trimmed and broken into florets)
  • 1 tablespoon butter - more for greasing the oven dish
  • 4 anchovy fillets (finely chopped)
  • 2 tablespoons plain flour
  • 1 garlic clove (finely chopped)
  • 2 cups milk
  • 1 tablespoon Dijon mustard
  • Pinch of freshly grated nutmeg
  • 150g Cheddar (grated) - more for topping
  • 1 tablespoon fine fresh white breadcrumbs
  • Salt and freshly ground black pepper

Method:

  1. Preheat the oven to 180°C.
  2. Cook the cauliflower in boiling salted water until just tender - should be no more than 5 minutes. Remove from the salted water, run the cauliflower through cold water under the tap, then drain thoroughly in a colander.
  3. Grease the sides and edges of an ovenproof dish then tip the cauliflower in.
  4. To make the sauce, melt the butter in a medium-sized saucepan. Add the chopped anchovy fillets. Stir the butter around until the anchovy fillets start to melt into the butter. Spoon in the flour and stir for about 1 minute.
  5. Add in the chopped garlic. Continue stirring for another minute or so.
  6. Lower the heat and gradually beat in the milk.
  7. Add in the mustard and nutmeg. Bring the sauce back to a slow simmer for and about 3-5 mins and keep on stirring while it simmers.
  8. Stir in the Cheddar cheese and season generously with salt and pepper.
  9. Taste the sauce, it should be a bit on the saltier side.
  10. Pour the sauce over the cauliflower.
  11. Sprinkle the extra Cheddar over the top, then the breadcrumbs and top with a couple of grinds of salt and pepper.
  12. Bake for 25-30 minutes, or until the top has turned golden brown and bubbling.

Notes:

  • Running the cauliflower straight after cooking under a cold water tap helps stop the heat in the cauliflower to 'continue cooking' it.
  • The cheese sauce should be at a slightly thicker consistency, but still runny enough to be able to pour out of the saucepan.

03 July 2009

Butternut Pumpkin Souffle

I had some left over butternut pumpkin from last night's roast in the fridge. Instead of heating up the roast pumpkin and having it again for dinner tonight, I tried to make something different with it. I'm kinda in a savoury Souffle phase at the moment. So I had a go at making a butternut pumpkin souffle. I based my recipe along a cheese souffle recipe that I'm pretty accustomed to, but substituting the cheese with the pumpkin. The results turned out quite tasty and the souffle was very fluffy. Although next time I might try roasting the pumpkins with some honey to help add a bit of sweetness.


Butternut Pumpkin Souffle
An Astrogirl recipe

Preparing the Ramekins

  • 2 tablespoons of butter
  • 4 ramekins (single serve)
  • Parmesan cheese (crumbled\grated)

Butter generously the inside of four ramekins with the softened butter. Divide the grated Parmesan among the ramekins and rotate them so the butter catches the cheese. Tap out any excess. Place ramekins into the fridge until ready to be used.

Roux
In a saucepan combine together:

  • 4 tablespoons of unsalted butter
  • 4 tablespoons of all-purpose flour
  • 1 cup milk

Cook Roux for about 1 min, then take saucepan off the heat and mix in:

  • 4 egg yokes (whites to be used later)

Base Flavored Mixture
In a food processor, blend together, then add into the Roux:

  • 500g roasted butternut squash flesh (if not using leftovers, then just roast in oven for 1hr at 180C, then scoop out the flesh).
  • 1/2 teaspoon sea salt
  • 2 garlic clove, finely chopped
  • 1/2 handful of fresh sage leaves
  • 1 teaspoon smoked paprika
  • freshly ground black pepper

Egg Whites
In a clean glass bowl, beat the following together till soft peaks form:

  • 4 egg whites
  • 1/4 tsp baking powder
  • pinch salt

Preheat an oven to 180°C.

Mix a quarter of the egg whites in with the butternut pumpkin mixture in the saucepan. Then gently fold in butternut pumpkin mixture into the remaining egg whites in the glass bowl with a spatula.

Divide the souffle mixture into the 4 ramekin, about 3/4 full. Place the souffle on a baking tray then place into the oven and bake for 20-25 minutes.

Remove and serve immediately.


20 August 2006

Potato Gratin

The classic potato gratin is pretty much putting together 3 thinly sliced yellow potatoes, 1 cup of heavy cream, butter and some salt & pepper. No onions. No cheese.

I'm sure anything with a whole cup of full cream and butter would taste great. However, I'm not sure my body would let me get away with it. So with my recipe, I've halved the cream and substituted the remainder with milk. I've also gone the not-so-classic way and added in some garlic, onions and cheese alternated between the potato layers.

Using a small casserole dish I was able to fit in about 4 whole potatoes.

Potato Gratin
  • 4 potatoes (golden ones for baking - not sure about the actual name)
  • 1/2 cup of heavy cream
  • 1/2 cup of milk
  • 3 clove of garlic (chopped finely)
  • 1 medium size brown onion (thinly sliced)
  • 2 handfuls of shredded cheese (I used cheddar)
  • Salt & Pepper
  • Soften Butter (enough for the casserole dish and more for dotting)
  • Freshly grated nutmeg

Peel and slice the potatoes thinly then leave soaked in a bowl of cold water (about 30 mins).

While that is soaking, chop the garlic and slice up the onion. Butter the casserole dish and sprinkly 1/2 of the chopped up garlic around the dish. Remove potatoes from the water and dry with a paper towel once it has had about 30 mins.

Stir and combine the milk and cream together with a fork.

Make a layer of potatoes, add some onions, salt & pepper, sprinkle with a bit of the garlic and dot with butter pieces. Drizzle with a bit of the cream\milk concoction. About 1/2 way up from the dish, sprinkle with 1/2 of the cheese. Repeat this until all the potatoes have been used. End the top with a dabbing of butter, the remainder of the cheese, the last bit of cream, and a sprinkling of salt and pepper. Finish up with the freshly grated nutmeg.

Related Posts with Thumbnails