Showing posts with label Chinese. Show all posts

06 August 2010

Steamed Garlic Prawns (with Coriander)

Just realised I've been neglecting my blog a bit. Its nearly been two months since my last posting. I do have a good excuse though.. I've finally purchased my own apartment !!! Woot !

After sorting out the home loan, I've been running around trying to sort out the renovation work. Getting quotes from builders, and choosing everything from toilet, tiles to taps. So needless to say, I haven't been able to do much cooking.

I love my garlic prawns. I've had similar dishes to this at Chinese restaurants before, but I've only seen it cooked with garlic only and maybe some spring onions thrown over the top as garnish. Although I would agree you can never have too much garlic in a dish, I like to mix in some coriander to lighten it up a bit and add some extra freshness into the dish. The key with cooking this dish is to steam the prawns over simmering water for no more than 3 minutes. And to use hot oil to "pre-cook" the coriander and garlic mixture.


Steamed Garlic Prawn (with Coriander)

Ingredients:
  • 1 Dozen Fresh King Prawns (vein removed, using scissors open the prawns up flat)
  • 1/2 bulb garlic (finely chopped)
  • 1/2 bunch fresh coriander (stem & leaves, finely chopped)
  • 4 tablespoons of Grapeseed oil
  • 1/2 teaspoon of salt
Method:
  1. Using a pair of scissors, cut through the shells and open up the prawns until they can lie down flat and remove the vein. Give the prawns a quick wash in some icy cold water and then leave in a colander.
  2. Prepare the garlic and coriander mix, and add in the 1/2 teaspoon of salt. And set aside in a ceramic, glass or heat proof bowl.
  3. Bring a wok with some water for steaming to boil.
  4. Using a separate saucepan, heat up 2 tablespoons of grapeseed oil until the pan starts to smoke.
  5. Pour the hot oil into the garlic and coriander mix. Work slowly and pour a bit at a time into the bowl. The garlic and coriander should be cooked by the hot oil.
  6. Lay out the prawns on a plate, and smear a spoonful of the garlic and coriander mix into each prawn's exposed flesh
  7. Place a rack into the wok
  8. Place plate over the rack, cover and let steam for about 2-3 mins (depending on the size of the prawns used). My prawns were about my hand's length long and I steamed them for just under 3 mins.
  9. Once done, remove the plate from the wok and set aside.
  10. Heat up the remaining 2 tablespoons of grapeseed oil and lightly drizzle the hot oil over each prawns.
  11. Serve immediately with some steam rice.


Enjoy.. :)


09 April 2010

Cantonese Style Beef Brisket

After the Beef Rendang, I've been looking around to find another recipe that I can make in bulk on the weekends, then frozen and ready to be consumed during the week. Work has been rather busy the past week, and by the time I get home, there just isn't enough time to cook something from scratch.

This Cantonese Style Beef Brisket is relatively inexpensive (at about $5-6 for 1kg of beef brisket) and quite easy to make. It also freezes really well and goes great with plain rice or noodles. The Daikon Radish was added to bulk up the stew a bit more. Unlike potatoes, the radish doesn't break down and isn't starchy after cooking. Its not a must have item, and you can omit this if you can't find any radish. However, if you are able to easily source some then do try adding them to the stew. As during the cooking process, the radish sucks up all the flavours of the stew and becomes really quite tasty. :)


Cantonese Style Beef Brisket
Recipe adapted from Pigpigscorner.com
  • 1kg Beef Brisket (chopped into chunks)
  • 500g Daikon Radish (peeled and chopped into chunks)
  • 1/4 cup Shaoxing Wine
  • 5 slices Ginger
  • 3 cloves Garlic (crushed)
  • 2 tablespoons Chu Hou Sauce
  • 2 Star Anise
  • 1 piece Cassia bark
  • 1 small piece of Rock Sugar (about
  • Light Soy Sauce
  • Cornstarch Slurry (1 teaspoon cornstarch mixed with cold water)
Method:
  1. In a pot heat up the oil, add ginger and garlic, saute until fragrant.
  2. Add beef brisket and stir until the beef is evenly brown
  3. Deglaze with the Shaoxing wine.
  4. Mix in Chu Hou sauce.
  5. Add star anise and cinnamon stick
  6. Add radish, rock sugar and enough water to cover all ingredients.
  7. Bring liquid to boil, lower heat and cover to simmer until meat is tender (at least 1 1/2 hours). Stir the ingredients around half way through. I left the stew simmering for 2 hrs.
  8. Add light soy sauce to taste.
  9. If required, thicken the stew with cornstarch slurry.
Notes:
  • Chu Hou Sauce is available at most Asian supermarkets.


06 April 2010

Sambal Chilli (Shrimp Paste & Ikan Bilis)

I came across this recipe from The Little Teochew when I was looking around for a sambal chilli recipe. After reading it, I thought .. Ground ikan bilis.. what a great idea ! You get the taste and depth ikan bilis took to the table with the sambal chilli, but without having to constantly be munching on them. Wonderful. :)

I was looking for a sambal belacan type of chilli recipe though. So I omitted the salt and threw in some shrimp paste. And also added some dried chillies for extra heat.

As Ju from the little teochew said.. Its savoury, spicy and sweet at the same time. I think my sambal turned out a bit dry (but still very tasty), so will probably double the amount of oil required the next time.


Sambal Chilli (Shrimp Paste & Ikan Bilis)
recipe adapted from The Little Teochew
  • 70g Fresh Chilli
  • 1 large red onion
  • 10 dried red chilli (soaked in water)
  • 6 cloves garlic
  • 3 tablespoons oil
  • 80g ikan bilis (grounded)
  • 1 tablespoon piece palm sugar
  • 1 tablespoon sized piece of belacan (dry toasted in foil packet)
Method:
  1. Blend fresh chilli, soaked dry chilli, red onion and garlic together in a food processor to form a smooth paste.
  2. Wrap the belacan in some aluminium foil and toast it over a hot pan until you start to smell the shrimp paste.
  3. To the heated pan, add the oil and stir fry the ikan bilis powder until fragrant. Add the blended chilli paste, toasted belacan and sugar and stir fry for another 15 mins until the oil starts to separate.


30 March 2010

Beef Rendang

I love the aromatic spices that fills my kitchen when I make this dish. The weather has started to turn chilly the past couple of days, and whats better than sitting in front of the TV with a warm bowl of spicy coconut beef stew ??

It usually takes me about 3 hours from beginning to end to make this, but it is so worth it. :)

Whenever I do make this now, I try to make a big pot, so that at least it lasts a bit longer. The leftovers always taste better the next day or two.

If I really wanted Beef Rendang right now, then I'll resort to my pressure cooker recipe. But in terms of taste, this recipe from Rasa Malaysia is still ahead by a long way. I don't think I've gone back to my pressure cooker recipe ever since I discovered this one.

My local Asian Butcher doesn't understand what Beef Short Rib is, so I settle for Gravy beef or Chuck Steak instead.


Beef Rendang
Recipe from Rasa Malaysia.com

Ingredients:
  • 1 1/2 pound boneless beef short ribs (cut into cubes)
  • 5 tablespoons cooking oil
  • 1 cinnamon stick (about 2-inch long)
  • 3 cloves
  • 3 star anise
  • 3 cardamom pods
  • 1 lemongrass (cut into 4-inch length and pounded)
  • 1 cup thick coconut milk
  • 1 cup water
  • 2 teaspoons tamarind pulp (soaked in some warm water for the juice and discard the seeds)
  • 6 kaffir lime leaves (very finely sliced)
  • 6 tablespoons kerisik (toasted coconut)
  • 1 tablespoon sugar/palm sugar or to taste
  • Salt to taste
Spice Paste:
  • 5 shallots
  • 1 inch galangal
  • 3 lemongrass (white part only)
  • 5 cloves garlic
  • 1 inch ginger
  • 10-12 dried chilies (soaked in warm water and seeded)
Method:
  • Chop the spice paste ingredients and then blend it in a food processor until fine.
  • Heat the oil in a stew pot, add the spice paste, cinnamon, cloves, star anise, and cardamom and stir-fry them until aromatic.
  • Add the beef and the pounded lemongrass and stir for 1 minute.
  • Add the coconut milk, tamarind juice, water, and simmer on medium heat, stirring frequently until the meat is almost cooked.
  • Add the kaffir lime leaves, kerisik (toasted coconut), sugar/palm sugar, stirring to blend well with the meat.
  • Lower the heat to low, cover the lid, and simmer for 1 – 1 1/2 hours or until the meat is really tender and the gravy has dried up.
  • Add salt to taste. If not sweet enough, add more sugar to taste.
  • Serve immediately with steamed rice and save some for overnight.
Notes:
  • To prepare the kerisik or toasted coconut, just add the grated coconut to a dry wok and stir continuosly until they turn golden brown.
Additional Notes:
  • I found that about 1 hour in (maybe because I have a rather fierce gas stove), the gravy had mostly dried out. I added in probably about 1/2 cup of water and gave it a bit of a stir every 15 mins or so. Until the 1 1/2 hour mark was reached.


21 March 2010

Otak Otak (Grilled)

Otak Otak is a parcel of spicy fish coconut custard. Which is sometimes referred to as 'Fish Mousse'. I was introduced to these little babies when my old Uni friends took me to the Bedok night market place in Singapore. Back in Australia, by chance I happened to find Otak Otak being sold at one of the stalls in the South Sydney market. But it wasn't really the same. Sure.. I could go to Malaya (A top notch Malaysian cuisine restaurant in Sydney) and order Otak Otak there. But there's something about paying $15 for two pieces of Otak.. it just doesn't feel right.

So I decided to make my own. :)

That's when I realised there are two versions of Otak Otak. The steamed version which seems to originate from Malaysia - which I found many recipes for online. Then the Grilled Singaporean version - which I found many pictures of online, but no recipes.

So I took the recipe for the steamed version, changed bits and pieces of it according to what I could recall consuming and came up with this.

I changed the fish fillet slices to mince fish paste, since I don't remember there being any individual slice pieces of fish. A lot of recipes recommend getting Spanish Mackerel, but there wasn't any available at my local fishmonger, so I settled for some Red Snapper fillets instead. I also don't recall there being any whole betel leaves in the grilled Otak parcel. Also, being in Australia, I'm not actually sure where you can actually buy these. So I left them out also.

If you like, you could substitute spinach leaves for the betel. I tried this with the first couple parcels, but ended up leaving the leaves out.


Otak Otak
recipe adapted from Nonyafood.com

Ingredients:
  • 1 banana leaf (cut into 12-15 cm wide rectangles and soak in hot water to soften the leaf)
  • 500g fish fillet (minced with a food processor)
  • 20-30 wild betel leaves (daun kaduk) - If you can find any
Spice Paste:
  • 10 shallots
  • 3 cloves garlic
  • 6 fresh red chilies
  • 5 dried red chilies (soaked in water)
  • 2 stalks lemon grass
  • 1 inch galangal
  • 1 inch turmeric
  • 20g shrimp paste (toasted)
  • 2 teaspoons palm sugar (pounded into a soft powder)
Custard ingredients:
  • 2 eggs
  • 1 cup coconut milk
  • 2 teaspoons rice flour
  • 3 kaffir lime leaves (finely sliced)
  • 1 teaspoon salt
Method:
  1. Roughly chop up the spice paste ingredients and then place in a food processor and blend until fine.
  2. Remove spice paste from the food processor and set aside in a large bowl, add fish fillets to the food processor and blend until it has turned into a minced fish paste.
  3. Transfer the fish paste into the spice paste bowl and stir well to combine.
  4. Add in the custard ingredients and mix well.


  1. Cut out the banana leaves into 15cm wide rectangles.
  2. Soften the banana leaves by soaking them in hot water.
  3. Take 1 piece of banana leaf and place 2-3 betel leaves (if using) in the center of a banana leaf. Then add 2-3 tablespoons of the Otak mixture into the middle of the leaf.
  4. Form a bundle by folding one side of the banana leaf over the mixture, and then turning it over once to use the remaining side. Secure the ends with staples or toothpicks.
  5. Heat up a grill pan (I used my cast iron grill pan) over high flames. And grill for about 10 mins, turning every 2-3 mins. If you have a charcoal grill bbq, use that instead.
  6. Serve immediately.


And the finished product...Ta Daa..!

Although I remember these being a bit darker in colour. The taste was very close though. I mean, the taste and fragrance of the spices were all there, but it wasn't totally the same, I think the texture was slightly different. P thinks the difference was because we didn't cook it over a charcoal grill. I think he might be right, as the Otak would have dried out a bit more if we had cooked it over a charcoal grill. And that might help to intensify the flavours and get the texture we wanted.


So with some time still left before the shops started to close (Its Australia..Shops close 5pm on Sundays), we drove to the nearest Barbecues Galore store and bought ourselves a small charcoal barbecue. :)


After getting everything setup and the charcoal beads burning.. We finally made this..


Mission accomplished.. :)


20 March 2010

Coconut Milk & Sago Agar Agar Jelly

Later today, I'll be heading over for a Hot Pot session at S & P's place. Yes... I have mad friends that have Hot Pots on 29C days. Although I'm probably equally as insane as I told them I'll be there too and will bring something for dessert. S's specialty is a Taiwanese Style hot pot that is not only hot in temperature, but also super hot in Chilli spice levels. So hot that your mouth actually goes numb. I'm not sure what she uses, as it is apparently a family recipe. All I know is that she starts cooking the soup base from scratch the night before.

As I promised to bring something for dessert, all I could think of was something that was a bit more cooling. I also wanted to make something that would be able to use up the remainders of an open carton of coconut milk I had leftover from the Otak Otak. I was thinking of Coconut milk and Sago, but since I had to transport it to my friend's place, I preferred something that wasn't in a liquid form. After a quick search online, I stumbled upon this recipe at My Kitchen Snippets. And decided to go with something similar.

I didn't have any food colouring, so used a couple of drops of Pandan essence instead.


Coconut Milk & Sago Agar Agar Jelly
Recipe adapted from My Kitchen Snippets

Transparent Layer:
  • 1 tablespoon Agar Agar powder
  • 600ml water
  • 1/4 cup white sugar
  • 1 Pandan Leaf (tied into a knot, or a couple drops of Pandan essence)
Coconut Milk Layer:
  • 1 tablespoon Agar Agar powder
  • 500ml thin coconut milk
  • 100ml water
  • 1 Pandan Leaf (tied into a knot, or a couple drops of Pandan essence)
  • 1/4 cup white sugar
For the Sago:
  • 2/3 cup Sago pearls
  • 3 cups of water
Method:
  1. In a saucepan, bring the 3 cups of water to boil. Add in the sago pearls and boil uncovered for about 10 mins. After 10 mins, cover the saucepan with a lid and turn off the heat and let sit for another 10-15 mins, until the sago has gone transparent. Pour the contents out into a sieve and rinse under cold water. Divide sago into 2 portions.
  2. Make the Coconut layer by boiling together the agar-agar powder with water, pandan leaves or essence. Make sure there are no lumps before adding in the sugar and coconut milk. Bring to boil and then turn the heat back down to a very low flame.
  3. Make the Transparent layer by boiling together the agar agar powder, water, sugar and pandan leaves or essence. Once the mixture has reach the boiling point, turn the heat down to the lowest setting.
  4. Add one portion of the sago into each of the mixtures and stir well.
  5. Pour in 1/2 of the transparent layer (make there is sago) in to a 8" wet baking dish or mold. Place the dish in to the fridge for about 5 mins to let it set
  6. Remove from the fridge, gently scratch the surface with a fork.
  7. Take another 1/2 of the coconut mixture and pour on top of the transparent layer, return to the fridge for another 4 mins to let it set.
  8. Continue the same process, gently scratching the surface with a fork before pouring on the remaining transparent layer and repeat the process with the remaining coconut layer.
  9. Chill in the fridge for a couple of hours before slicing. Serve cold.

Taste Test: Leftover bits of the Transparent layer that was just enough for 1 cupcake mold.

Notes:
  • Agar Agar powder and strips are commonly found in Asian grocery stores. You can substitute with Gelatine instead and follow the instructions on the back of the packet.
  • To help unmold the jelly, place it on top of a hot towel for about 30 secs then tip it upside down onto a plate.


02 March 2010

Chinese Dried BBQ Pork - Bak Kwa

I did it. I made my own Bak Kwa ~~~~~~ !!! Woot !!

When I saw the recipe on pigpigscorner, I knew I had to try it out. The original recipe calls for the meat to be baked in the oven for 20 mins on low and then 15 mins more on high. I found that with 15 mins on high, my Bak Kwa came out a bit more burnt than I would have liked. So I cut it down to 5 mins on each side.

I also used pork neck and minced the meat myself in my Magimix food processor. You can just use pork mince from the butcher. But ask for one that has a higher content of fat. The fatty parts is what makes the Bak Kwa taste so yummy. :)

Chinese Dried BBQ Pork - Bak Kwa
recipe adapted from pigpigscorner.com

  • 500g of Pork Neck (minced)
Seasoning:
  • 1½ tablespoon Fish Sauce
  • 1 tablespoon kecap manis
  • 1 tablespoon Cheong Chan Thick Dark Soy Sauce (Thick Caramel Sauce) - Optional
  • 1 tablespoon Light Soy Sauce
  • 1 tablespoon chinese rice wine
  • 1 teaspoon chinese 5 spice powder
  • 1 teaspoon oil
  • ½ Cup Sugar
To brush on top of meat:
  • 1 tablespoon Honey mixed with ¼ cup of hot water
Method:

  1. Mince the meat up in a food processor.
  2. In a big bowl, add the seasoning to the minced meat.
  3. Stir the mixture with a pair of Chopsticks in one direction, until minced meat becomes like glue.
  4. Put some of the gluey minced meat on a baking paper. Cover the meat with a big cling wrap or plastic sheet and use a rolling pin to roll the meat to about 2mm thick.
  5. Remove the plastic sheet and put the entire baking paper with the minced meat on a baking tray.
Baking:

  1. Bake in preheated oven at 120C for 20 minutes.
  2. Then increase the temperature to 180C and bake for about 5-7 minutes.
  3. Remove the baking tray from the oven and let the meat cool for about 5 minutes.
  4. Flip the meat over onto a fresh baking paper, brush with some of the honey water and bake for another 5 minutes at 180C.
  5. Cool the bak kwa and cut into pieces (I used a pizza cutter) before storing in air-tight container.


18 February 2010

Beef Oyster Sauce

This is probably a dish that can be found on nearly every Chinese takeaway menu. But the same dish from two different restaurants can be very different. Nowadays, I think anything with beef, vegetables and a dollop of oyster sauce is just called Beef Oyster Sauce.

This recipe is slightly different to the Beef with Oyster Sauce you get from the Chinese takeaway shops.

Its main ingredient is Oyster sauce, and the beef is marinated in it for at least 2 hrs (overnight is ok in the fridge). The beef is then accompanied with some finely sliced ginger sticks and spring onion blades.

Ginger is quite fibrous, so take the time to slice the ginger sticks as fine as you can. You don't want to end up unpleasantly munching down on a large chunk of ginger. Also, try not to overcook the beef. This dish should only require about 4-5mins of stir frying in the wok.

I actually prefer this served on top of a piece of lightly buttered bread or toast, than as a dish accompanied with steam rice.

Beef Oyster Sauce

  • 250g Beef Skirt (sliced across the grains of the beef)
  • 3 tablespoons Oyster sauce
  • 1/2 tablespoon vegetable oil
  • 1/2 teaspoon salt
  • 1 teaspoon sugar
  • 1 teaspoon cornflour
  • 1 tablespoon water
  • 1 tablespoon ginger (finely sliced into sticks)
  • 1 Stalk Spring Onion (finely sliced diagonally)
Method:

  1. Marinate the sliced up beef with the oil, oyster sauce, salt, sugar and cornflour. Add a splash of water, about a tablespoon and continue to mix. Let sit for at least 2 hours.
  2. Heat some vegetable oil in a Wok, until the oil just begins to smoke, pour in the marinated beef and stir fry until the beef has started to turn pink. This should take about 2-3 mins
  3. Add in the finely sliced ginger, and continue to stir fry for another minute then toss in the sliced up spring onions.
  4. Stir the contents around the wok to make sure everything is mixed in together. Then turn the heat off and pour the contents on to a plate to serve immediately.


13 February 2010

Steamed Minced Tofu with Dace Fish Paste

Ok. So after the Agedashi Tofu and Steamed Tofu with Fish Paste & Black Bean Topping, I still had leftover fish paste and about 1/4 pack of the tofu sitting in the fridge.

Fish paste can be kept in the freezer and defrosted when required. To prolong the life of the tofu, change the water the tofu is sitting in daily. The tofu should be able to last about a week after first open.

This dish is great when dealing with leftover bits of tofu and fish paste. Basically, you just mince and mix both ingredients together, add some seasoning and steam it for about 10 mins and your done.

I remember having it at my Aunt's place and she had jokingly told me this was a dish that was for toddlers and old people only. When I had asked why, she replied that this dish was designed for people with no teeth. Great. Still not sure who on the table this dish was aimed at, but I do recall it to be really tasty.

Steamed Minced Tofu with Dace Fish Paste
  • 250g of tofu
  • 250g of fish paste
  • Pinch of Salt
  • 1/2 teaspoon sugar
  • Pinch of White Pepper
  • 1 Egg white
Topping:
  • 1 teaspoon Re-hydrated Dried Shrimp (finely chopped) - Optional
  • Cooked oil
  • sesame oil
  • 1/2 teaspoon light soy sauce
  • Spring onion (finely sliced - for garnishing)
  • Coriander (top half with leaves only - for garnishing)
Method:
  1. Using a fork, mash up the tofu and mix well with fish paste.
  2. Add in a pinch of salt, sugar, white pepper and egg white and continue mixing until its all combined and smooth.
  3. Scoop out the contents and set in a shallow dish. Gently level the surface with a spoon.
  4. If using, sprinkle about a teaspoon of finely chopped dried shrimp over the surface
  5. Cover the dish with some cling wrap, ready for steaming
  6. Bring some water to boil in a wok with a steamer tray. Using the wok as a steamer, place the dish in to steam for about 10-15mins on medium heat.
  7. Remove from the steamer and carefully remove the cling wrap (watch for the hot steam here), garnish with some spring onions and coriander leaves.
  8. Place a saucepan with about a tablespoon of oil on high heat
  9. Drizzle with some sesame oil and light soy sauce over the garnish
  10. Carefully pour the hot oil over the garnish, they should sizzle and cook immediately. The hot oil helps to bind the flavours of the soy, sesame oil, coriander and green onion together.


10 February 2010

Chicken with Shiitake Mushrooms & Chinese Sausage

I often think about the Chinese dishes my grandma makes since moving to Sydney. Whenever I do, I try to replicate them with her helping me over the phone since she now lives 5hrs flight away from me. As a first-generation Australian, my grandma is the source of all my chinese, cantonese style cooking.

Yes... My grandma and not my mother, my mummy is a rather hopeless cook. Not that its her fault, its just not her forte, she was much better at running her business than being in the kitchen.

Now that she has retired, she has started cooking at home. And I've been kept sufficiently entertained by the horror stories my bothers have been updating me on her cooking attempts. The latest had something to do with a steamed fish dish my mummy tried to produce. Somehow, the thickest part of the fish ended up being too undercooked, semi-sashimi-like apparently. Instead of continuing to steam the fish in the wok. My mummy decided to put it into the microwave and nuke it for about 3 mins. Steamed fish is supposed to be moist and delicate, according to my brothers it was rather rubbery and tough. Opps...:)

My grandma had her fair share of laughs over this last attempt as my mummy complained to me about the convoluted instructions my grandma gave her. "Pour some soy sauce over the fish.. but not too much".... "Steam until you can just poke a chopstick through".... "Use just enough ginger to remove the fishy smell"....

Ahh.. the same instructions I've been getting from my grandma over the phone. Its taken me a few trial & error attempts to decrypt my grandma's instructions. But now I have gotten used to it. This dish is another one of my grandma specials. Sometimes she would make this for breakfast, but mostly it was for dinner and always to be served with steamed rice.

Oh...The sauce that is produced from this dish... I could eat a bowl of rice just with the sauce alone..yum... :)

Chicken with Shiitake Mushrooms & Chinese Sausage
Original recipe from my grandma

Ingredients:
  • 2 Chinese sausage (sliced diagonally)
  • 2 Maryland Chicken Thighs (cut into 3cm wide pieces)
  • 6 Chinese mushrooms (soaked, stalk removed, cut into half - water reserved)

Marinade:

  • 1 tablespoon of vegetable oil
  • 1 tablespoon light soy sauce
  • 1 1/2 tablespoon oyster sauce
  • 1 tablespoon Chinese cooking wine
  • 1 thumbsized piece of ginger (smashed)
  • 2 teaspoon sugar
  • 1 teaspoon salt
  • 1 teaspoon corn flour
  • 1/4 cup water from the soaked mushrooms

Method:

  1. Mix chicken, mushrooms and sausage with marinade ingredients and let stand for 30 minutes. You may need to add more of the reserved mushroom water if the marinade mixture is too thick.
  2. Pour the marinated chicken, mushrooms and Chinese sausages in to a deep dish ready for steaming.
  3. In a wok, bring some water to boil. Place a steamer rack on top and then place chicken dish in for steaming.
  4. Steam for about 25 mins at medium high heat, or until the chicken is cooked through.
  5. Remove from steamer and serve immediately.


08 February 2010

Chinese Braised Pork Belly - Dong Po's Pork - 東坡肉

Ok. I promise this is going to be my last pork belly dish. Its not that I think my waistline can't take it.. (my motto: eat first.. think later)... but I think my flatmates will revolt against me if I continue to cook any more pork belly recipes.

There are many recipes on the web for Dong Po's Pork that calls for the pork belly to be deep fried first, or braised in wine and stock with star anise, cinnamon, fennel seeds and citrus peels. For this attempt, I've tried to stick to a simplier and probably more traditional version, which calls for only soy sauce, Chinese rice wine, spring onions, ginger and block sugar.

The resulting fat wasn't really fat anymore. Well it was still fat.. but all the oil had been rendered out from the hours of braising and steaming. After all the braising and steaming, the fat was so soft, it would just melted in your mouth.

Although the next time I make this... (and I will probably make this again).. I will throw in 1 or 2 star anises. Just to help the flavour along a bit more. :)


Chinese Braised Pork Belly - Dong Po's Pork 東坡肉

  • 1kg pork belly
  • 100g spring onion (white part only)
  • 100g block sugar
  • 500ml yellow chinese rice wine (绍酒)
  • 50g ginger (smashed)
  • 100g light soy
  • 20g dark soy

Method:
  1. Bring some water to boil in a large pot or wok
  2. Remove any coarse hair on the skin with a tweezer then wash the pork well. Blanch the pork in boiling water for 5 mins, then remove from the pot and place on a chopping board or plate to rest. The water can be emptied out.
  3. Divide and cut the pork belly into large cubes (about 4cm wide). You should be able to get about 4 large or 6 smaller cubes out of a 1kg piece of pork belly.
  4. Tie the pork up with some cooking string. This helps keep the pork cubes in shape and also makes it easier to remove from the claypot afterwards.

little parcels of pork... humm... :)

  1. Place spring onions and ginger at the bottom of a claypot
  2. Lay the pork cubes on top of the shallots and ginger, then add sugar, light soy and dark soy
  3. Pour in the yellow rice wine last. Just enough to cover the pork
  4. Turn the heat up and bring the wine to boil. Then reduce to a low flame and cook for about 3 hrs, until pork is meltingly soft and you can use a chopstick to poke through a piece with minimal effort.

After braising for 3hrs...

  1. There should be a significant layer of fat being released from the pork cubes. To remove this, place the claypot with the sauce into the fridge (overnight is Ok if you are serving this the next day) and let sit until the fat layer starts to turn white. When the fat has hardened, use a spoon to skim off the fatty layer.
  2. Place the pork, skin side up and put into a baking dish or bowl and cover with cling wrap.
  3. Using a wok and some water for a steamer, bring the water to boil, place a steamer rack inside the wok and place the dish of pork belly on top. Steam for about 45mins
  4. With the sauce still in the claypot, bring it back to boil and leave it boiling for another 10 mins or so to reduce the sauce and intensify the flavour a bit more.
  5. Once the steaming has completed. Take out the pork, cut and remove the cooking string and arrange on a serving plate. Pour some of the fat-removed sauce over the pork cubes and garnish with lots of sliced spring onions and coriander.
Notes:
  • 2 cups or 500ml of chinese rice wine does seem like a lot. But you do need enough to cover the pork cubes. Also, the long hours of braising does cook all the alcohol out, and all that is left is a very rich and intense soy-based stock.


05 February 2010

Steamed Tofu with Fish Paste & Black Bean Topping

Fish paste is available at most Asian grocery stores and most Asian fishmongers would actually make their own 'ready to cook' version. If you want to make your own fish paste at home, then this post by Red Cook would probably be what I would recommend.

The fish paste I buy from the fishmonger is already seasoned. If you aren't sure if yours are, drop a teaspoonful of the paste into some hot boiling water and taste it. If it isn't seasoned, then add in about 1/2 teaspoon of salt and mix well.

The cling wrap used while steaming helps to keep the water from the condensation out of the tofu. This is an optional process as you can always just pour the water out. But after the time when I lost one of the tofu pieces.. it fell into the sink as I was trying to pour the water out.. doh!.. I've just used the cling wrap method instead. If you are employing this method, use a good quality known brand cling wrap, like GLAD or something similar, so that it wouldn't break and will survive the steaming temperatures.

This dish is like a steamed version of 'Yang Tau Foo' - which is like a fried tofu stuffed with fish paste - that I've had in Singapore before.


Steamed Tofu with Fish Paste & Black Bean Topping
makes 6 pieces

For the Tofu:
  • 6 pieces of silky tofu (usually 1/2 the packet)
  • 300g fish paste
  • dash white pepper
  • 1 teaspoon cornflour
For the Topping:
  • 1/2 teaspoon minced garlic
  • 1 heaped teaspoon fermented black beans (coarsely chopped)
  • 1 tablespoon light soy sauce
  • 1/4 teaspoon sugar
  • 1 teaspoon Chinese cooking wine (Shaoxing wine recommended)
  • 1/2 teaspoon red chili (finely chopped) - optional
  • 2 tablespoons vegetable oil
  • Fresh Coriander and Spring Onions (finely sliced diagonally) - Optional
Method:
  1. In a bowl, mix the fish paste with the white pepper and cornflour.
  2. Place a piece of tofu on your palm, then using a butter knife or a small spatula, take some of the fish paste mixture and spread it over the top of the tofu.
  3. Repeat until all the fish paste has been evenly divided amongst the pieces of tofu. Arrange on a plate and cover with cling wrap ready for steaming.
  4. Bring some water to boil in a wok and place a steamer rack inside.
  5. While you are waiting for the water to boil, prepare the black bean topping.
  6. In a small bowl, add the garlic, fermented black beans, light soy, sugar, Chinese rice wine and chilli (if using) and mix well.
  7. Once the water in the wok is boiling, turn the heat down to medium-low and place the plate of tofu on top of the steamer rack. Steam for about 10 mins, until you can see the fish paste is no longer transparent and is cooked.
  8. While the tofu is steaming, in a small saucepan, pour in 1/2 of the oil and turn the heat on high.
  9. Once the oil from the saucepan is steaming hot, pour it over the garlic and black bean mixture. This will cook the black bean and garlic.
  10. After 10 mins, remove the plate from the wok and discard the cling wrap.
  11. Pour in the remaining vegetable oil back into the same saucepan and place it back on high heat.
  12. Carefully spoon on top of the fish paste about 2 teaspoons of the black bean and garlic mixture. Drizzle the remaining soy sauce over the tofu pieces.
  13. Garish with coriander and some finely sliced spring onions.
  14. Once the oil is hot, remove from the heat and carefully pour (bit by bit) over the coriander and spring onions so that it sizzles and cooks. This helps to release the aroma and also makes the strong flavour of fresh coriander a bit more subtle.


04 February 2010

Steamed Minced Pork with Shiitake Mushrooms

In Chinese cooking, when Shiitake mushrooms are called for in recipe, it would mean using dried Shiitake and not fresh Shiitake. Dried Shiitake has a much stronger flavour than fresh Shiitake mushrooms. I think if you use fresh Shiitake mushrooms in most Chinese recipes, then the flavour would just be lost amongst the other ingredients. When using dried Shiitake, rinse the mushrooms through some cold water to remove any grit or dirt on the mushrooms, then reconstitute them in some warm water for at least 1 hour. Depending on the number of mushrooms you are soaking, you would probably need to use about 1 cup of water. At least enough to cover all the mushrooms. Always reserve the water used to soak the mushrooms and use it instead of water (if required) for some extra flavour.

This is another one of my grandma's recipes. Like most of her other recipes, this is a dish to have accompanied with a bowl of hot steamed rice. My grandma would use her double choppers to mince up the Pork Neck, but my arms don't have the stamina to wield double choppers to that effect, so I use Petals instead - My red Magimix food processor. Cut the meat into small cubed pieces, then place into the food processor and pulse until it has a consistency of a coarse mince. Try not to over do it, we don't want pork puree here. :)

In most Chinese restaurants, you can get steamed minced pork with salted fish or with salted duck eggs. Think of this dish as a variation of one of those. If I can get my hands on some quality salted fish, I might try that version next time.


Steamed Minced Pork with Shiitake Mushrooms
Original recipe from my Grandma
  • 300g of Pork Neck (coarsely minced)
  • 6 Dried Shiitake Mushrooms (reconstituted in warm water for 1hr - water reserved)
  • 1 tablespoon vegetable cooking oil
  • 1 tablespoon soy sauce
  • 1 teaspoon salt
  • 2 teaspoons sugar
  • 1 tablespoon oyster sauce.
  • 1 teaspoon cornflour
Method:
  1. Remove and discard the stalks of the reconstituted mushrooms. Slice and dice the mushroom into small pieces (just slightly less than 1cm in width).
  2. Take the mince pork and marinate with the oil, soy sauce, salt, sugar, oyster sauce and cornflour.
  3. Add in the diced mushrooms and mix well.
  4. Slowly add in about 1/4 cup of the reserved mushroom water and continue mixing.
  5. You should have a wet mince mixture that is easy to stir, add a bit more water if the mixture seems a bit too dry.
  6. Bring some water to boil in a wok and place a steamer rack inside.
  7. Scoop the pork mixture into a plate that could could be used to hold some liquid. Spread the pork mixture around evenly. And place the plate into the wok.
  8. Steam on medium-high heat for about 20 mins.
  9. Serve with some steam rice


01 February 2010

Egg Skin Dumpling with Pork and Spring Onions

From all the recipes my grandma has passed to me, these are my absolute favorites. Basically, its like making pan-fried dumplings. Only the meat is wrapped in a thin layer of egg - hence the name 'Egg Skin Dumplings'. To do this, you need a hot pan with quite a bit of oil. Once you place about a chinese soup spoonful of egg into the pan, the egg mixture will bubble up and start to cook. Before it completely cooks, you have to drop in another spoonful of pork and green onion mince into the egg and using a spatula or something similar, fold it in half and wrap the semi-cooked egg around the pork mince. If the egg is completely cooked, then it wont stick to the pork mince. So each step has to be kind of done immediately one after another.

Until I had figured out this process, I've always screwed these up. By the time I managed to scoop up right amount of mince filling to add into the egg, the 'egg skin' would already be over cooked. And so the egg would end up separated from the pork mince. Or I'll ended up burning the egg skin before the pork mince has had a chance to cook properly.

So .. here's how to do it.

The trick is to have the mince proportions 'pre-rolled' into small oval balls - about a soup spoonful - think dumpling size here. And laid out on a plate before you start making the 'egg skin'. Arrange everything around the frying pan so its easily accessible. The beaten eggs in one bowl with a chinese soup spoon and the mince pork with green onions balls on a plate.

Place about 2 tablespoons of oil into the pan, wait till it heats up. Yes.. it is quite a bit of oil, but any less and the eggs will start to stick to the pan.

Get 1 spoon of the egg mixture ready. With one hand, carefully pour 1 spoon of the egg mixture into the pan. As it starts to cook and bubble up, with the other hand, drop in one of the oval shaped balls of pork mince and fold and close up the egg dumpling with the spatula. Place spatula back down on the empty plate (which will be used to collect completed dumplings later), and repeat the process.

Lightly press down on each dumpling as they cook. Turn each Egg dumpling only once. They should only need about 2 mins on each side. After that remove from the pan and place onto the plate. The pork will cook in the later steps.

You should only have a maximum of about 4 egg dumplings cooking in the pan at any time. Over crowding the pan just makes your life harder.


Egg Skin Dumpling with Pork and Spring Onions
Recipe from my grandma - makes about 18 dumplings

For the Pork:
  • 250g pork neck (coarsely minced in a food processor)
  • 1 tablespoon cooking oil
  • 1 tablespoon soy sauce
  • 1 teaspoon salt
  • 2 teaspoon sugar
  • 1 teaspoon cornflour
  • 1 cup of green spring onions (finely sliced)
  • couple of dashes of sesame oil
  • 1/2 cup of water
For the eggs:
  • 6 eggs
  • pinch of salt
  • Additional oil for pan-frying
Method:
  1. Prepare the pork mince mixture. Process the pork neck (you can use any part of the pork) and the food processor until its turned into a coarse mince. Try not to over mince it into a pork puree!
  2. Season the pork mince with the above ingredients listed, then add in the spring onions. Add in half of the water first and stir to combine the mince and spring onions. Continue to add the remaining water until the pork mince and spring onions are well combined.
  3. Crack the eggs into a large bowl and beat with a fork or pair of chopsticks until the whites and yokes have broken down. Season with a pinch of salt
  4. Place the pan on medium-high heat, and add about 2 tablespoons of oil in the pan.
  5. Carefully pour in 1 soup spoonful of egg mixture, then add in the 'pre-rolled' pork mixture, then fold and close up the egg skin and cook for 2-3 mins on each side. Press lighly on the dumpling as it cooks to make sure the egg skin sticks to the mince, turning only once.
  6. Remove egg dumpling from pan once it has cooked for 2-3 mins on the 2nd side and place on a plate
  7. Add more oil to the pan if it starts to dry out. Repeat until either there is no more egg mixture or pork mince.
  8. Once you have reached the last dumpling, carefully return the dumplings on the plate back to the pan.
  9. Arrange the dumplings to fill up any gaps on the pan.
  10. Turn the heat up and pour in the remaining 1/4 cup of water, cover the pan and let the dumplings cook\steam for a further 4-5 mins. This will make sure the pork is cooked properly.
  11. Remove the cover and carefully transfer the dumplings to a plate. - Its handy to have good chopstick skills here. Tongs with silicon covers will also work.
  12. Serve with some steam rice.

19 January 2010

HK Style - Swiss Chicken Wings

Swiss Chicken Wings is not actually a "Swiss" recipe. The story goes that a foreigner in Hong Kong asked a waiter what was the name of the chicken wing dish he was eating and the waiter replied 'sweet sweet', but due to the difference in accents the foreigner thought he heard 'swiss swiss'. Hence now the name of Swiss Chicken Wings. This is my take on how to make this dish, which is commonly found in most HK Style cafes.

HK Style - Swiss Chicken Wings
Recipe adapted from afmag

Ingredients:
  • 1kg chicken wings (drumlets separated from wings - you can keep them together if you wish)
  • 1 thumbsized piece of ginger (smashed)
  • 1 star anise
  • 1/2 teaspoon of salt
  • 1/2 teaspoon of asian red chilli powder
  • 2 stalk spring onion (cut into 4cm sections)
  • a splash of sesame oil
Marinade:
  • 1 tablespoon Shaoxing wine
  • pinch of white pepper
Seasoning:
  • 1/2 cup water
  • 1 tablespoon dark soy sauce
  • 3 tablespoon light soy sauce
  • 2/3 slab brown block sugar

Method:
  1. Wash chicken wings. Pat dry. Mix well with marinade ingredients. Marinade for 20 minutes.
  2. Heat up 1 tablespoon oil. Stir-fry ginger slices till fragrant. Add chicken wings. Pan-fry briefly.
  3. Add the red chilli powder, salt, star anise and stir fry the wings to make sure the salt and chilli powder is evenly distributed.
  4. Add seasonings (pre-mixed). Braise over low heat till slab sugar dissolves and chicken wings are done.
  5. Add the spring onion slices to the chicken wings and continue to braise for about 2-3 mins.
  6. Transfer to plate. Sprinkle some sesame oil over the wings. Garnish with extra spring onion slices.
  7. Serve with some steamed rice


08 November 2009

Baked Tomato Pork Chop Rice

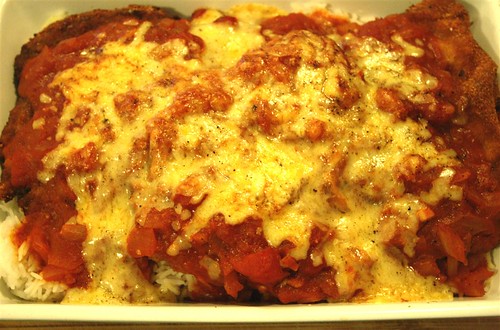
This first time I tried this was at a "Cha Chaan Teng", which in english can roughly translate to "Hong Kong Cafe" or "Chinese Tea Restaurant". Its basically a small cafe \ restaurant which serves westernised-chinese crossed with street-hawker type cuisine. Therefore, in one of these places, you will be able to order claypot chicken rice \ congee \ instant noodles \ french toast all washed down with a cup of iced Yin-Yong - A combination of Coffee and Milk Tea.

Yin Yong...And don't mock it till you try it. Its addictive stuff I tell you. Its also in one of these cafe restaurants that you can also find the Baked Tomato Pork Chop Rice.

The baked tomato pork chop rice is basically a layer of egg fried rice, topped with some deep fried crumbed pieces of marinated pork chop, then smothered with tomato based sauce, topped with some cheese and then baked in the oven.

Baked Tomato Pork Chop Rice
Based on recipe at galaxylink - Serves 4

For the Fried Rice

  • 4 bowls of rice
  • 2 eggs
  • 1/2 tsp salt
  • 1 teaspoon light soy sauce
  • 2 tbsp oil
For the Pork Chop

  • 8 slices of pork chop
  • 1 teaspoon of vegetable oil
  • 1 teaspoon salt
  • 1 teaspoon sugar
  • 1 teaspoon chinese 5 spice mixture
  • 1/2 tablespoon light soy sauce
  • ground black pepper
  • 2 teaspoon chinese wine
  • 1 garlic (mashed)
  • 1/2 teaspoon cornflour

Crumbling the Pork Chops

  • 1/2 cup flour (seasoned with some salt & pepper)
  • 2 eggs (beaten)
  • 1 cup bread crumbs
  • oil for deep frying
For the Tomato Sauce:
  • 1 teaspoon oil
  • 1 clove garlic (chopped finely)
  • 1 can of diced tomatoes
  • 1 onion (finely diced)
  • 1 cup of clear chicken broth
  • 1 teaspoon salt
  • 1 teaspoon sugar
  • ground black pepper
  • 2 tablespoon tomato paste
  • 2 tablespoon Worcestershire sauce
  • 1 teaspoon cornstarch (made into a paste with some water)

For the Topping:

  • Shredded Chedder cheese
Method:
  1. Beat the pork chop the back of a chopper to loosen up the meat.
  2. Marinade the pork chops in with oil, salt, sugar, pepper, 5 spice, wine and garlic for half an hour.
  3. Dredge the pork chops a piece at a time, first in flour, then in the beaten egg and finally in the bread crumbs. Set aside in the fridge until ready for deep frying.
  4. Preheat oven to 200C.
  5. Heat oil in wok till hot. Add the eggs and scramble the eggs until its just cooked, remove and set aside. Add cooked rice and stir fry over high heat. Add salt and soy sauce, then add the scrambled eggs back in and mix in with the rice. Put the fried rice on a large oven proof dish and set aside.
  6. In a saucepan saute the garlic and the onions in oil until it turns transparent.
  7. Add in the chicken broth, then the canned tomatoes. Bring the sauce to a boil
  8. Add tomato ketchup, salt, pepper and worcestershire sauce.
  9. Reduce heat and let simmer for 15 minutes. While the sauce is reducing, heat the oil for deep frying.
  10. Deep fry the pork chops in medium high heat till slightly golden brown and set aside on some paper towels to absorb any excess oil.
  11. Place the fried pork chop on top of the rice in a single layer. Thicken the tomato sauce with the cornstarch mixture. Pour the sauce evenly over the pork chop and sprinkle a handful of cheese over the top.
  12. Bake in the over for 5 minutes or till the sauce is slightly brown on top.
  13. Serve immedately - preferably with a cup of iced Yin Yong :)

pork chop rice


Tips on Crumbing:
  • Before you start crumbing, arrange the ingredients in a production line, in the order you'll be using them. ie. A large plate of flour seasoned with salt and pepper -> lightly beaten eggs into a bowl -> breadcrumbs on a separate large plate.
  • Try to keep one hand as the 'dry hand' handling the flour and breadcrumb plates and the other 'wet hand' for handling the marinated pork chops and the egg dredging part. This avoids your fingers to be crumbed as well :)
  • Once the pork chop pieces have been crumbed, cover with plastic wrap and place in the fridge for at least 30 minutes to rest before frying. This will help the crumb coating stick to the meat during cooking.

18 October 2009

Black Sesame Dessert Soup

This has always been one of my favorite chinese desserts. Well.. then there is the sweetened steam custard, mango pudding and steamed coconut pudding. All my other favorites. :)

It does take a bit of time to prepare this dessert, but the steps are actually really easy.

The nutty aroma from the black sesame seeds is intoxicatingly addictive.. :)

Black sesame is readily available from Asian grocery stores. If you aren't able to get roasted seeds, then you can toast the seeds over a hot saucepan before soaking and grinding the seeds.

This maybe the only ediable recipe that has been passed to me from my mum. Although she admits she originally got it from one of her friends. The rice is used to thicken the black sesame concentrate. You do need to spend a fair bit of time in front of a blender and pressing the mixture through a fine sieve. This process does need to be repeated about 3 times. The left over husk can be discarded, but some of my friends who have tried the end product, prefer to add a teaspoon of the husk into the soup. Apparently this gives the soup a bit more 'texture'.

Black Sesame Dessert Soup
Recipe via word of mouth from my mum's friend... :)

Serves 4

Ingredients

  • 300g Roasted Black Sesame Seeds
  • 1/4 cup white rice
  • 4 cups water
  • 2 large pieces Rock Sugar - adjust to taste

Equipment

  • fine-mesh sieve
  • blender
  • deep saucepan
  • large bowl

Method:

  1. Wash the white rice until the water runs clear.
  2. In a bowl, soak the rice with the black sesame seeds in about 2 cups of water. Then let sit for at least 2 hours
  3. Ladle about 2 spoonfuls of the soaked mixture into a blender and pulse until the black sesame seeds break open.
  4. With the fine-mesh sieve placed over the saucepan, pour the contents of the blender into the sieve. Using a soup spoon, push and strain the mixture through the sieve. Strain until the mixture starts to dry up.
  5. Set the strained mixture aside in another bowl.
  6. Spoon the strained mixture back into the blender add in about 1/2 cup of water and blend.
  7. Pour the contents of the blender into the sieve and continue to strain until the mixture dries up.
  8. Repeat this process until the soaked sesame bowl is empty, and all the black sesame seed husks are strained dry.
  9. Reserve the black sesame seed husks and set aside.
  10. Heat up the saucepan with the liquid black sesame, add in the rock sugar and slowly bring the contents to a simmer.
  11. The sesame soup should start to thicken as it simmers.
  12. Taste the soup and add more rock sugar if required.
  13. Add back in about 2 tablespoons of the reserved black sesame seed husk for a bit of texture and let simmer for about 5 minutes before serving.

Notes:

  • You can serve this dessert soup with some Glutinous rice balls. Just cook the rice balls separately as per the instructions on the packet, then add into the dessert soup just before serving.
  • Glutinous rice balls are available in the freezer compartment of most Asian Grocery stores.
  • Toasted sesame seeds from Japan seem to taste better.


08 October 2009

Claypot Chicken Rice

I've always loved the tasty claypot rice from the street stalls in Hong Kong. Actually been craving for it. So I've been trying to replicate it at home in the past couple of months... to some limited success. :P

The rice is supposed to form a fragrant brown crispy layer around the bottom of the claypot

However, the many times I've tried cooking it, I always seemed to burn that layer. The taste and flavour of the chicken was the same, but I'm not really fond of eating burnt rice.

So as a work around, I let the rice cook on the stove top for about 15 mins, while that was cooking, pre-heat the oven to about 180C then place the marinated chicken over the semi-cooked rice, then finish the dish in the oven instead of keeping it over the stove top.

Here is the recipe...

Claypot Chicken Rice
  • 2 ½ cups rice (washed and drained)
  • 2 Chinese sausage (sliced diagonally)
  • 1 ½ cm thick piece salted fish
  • 1 tablespoon dark soy sauce
  • water from the soaked mushrooms

Marinade:

  • 3 chicken pieces (Thigh pieces or Drumstick - cut into 3cm wide pieces)
  • 1 tablespoon of vegetable oil
  • 2 tablespoon light soy sauce
  • 2 tablespoon oyster sauce
  • 2 tablespoon Chinese cooking wine
  • 1 thumbsized piece of ginger
  • 1 tablespoon sesame oil
  • 2 teaspoon sugar
  • 1 teaspoon salt
  • 1 teaspoon corn flour
  • 5 Chinese mushrooms (soaked, stalk removed, cut into half - water reserved)

Method:

  1. Mix chicken, mushrooms with marinade and let stand for 30 minutes.
  2. Put rice and the reserved water from the soaked mushrooms into a claypot, add in salted fish, cover and let simmer over a lower fire till the rice is semi-cooked. (This should take about 15 minutes)
  3. Pre-heat oven to 180C
  4. Pour the marinated chicken, mushrooms and chinese sausages over the rice
  5. Cover the claypot and put into the oven
  6. Leave for about 15-20 mins until the chicken is cooked.
  7. Serve by drizzling the dark soy sauce over the chicken.


If you like the extra bit of semi-burnt rice, then put the claypot back on top of the stove and keep it on low heat for about 3 mins.

26 September 2009

Steamed Jumbo Oysters with Black Bean Sauce

Its actually hard to tell how big these oysters were from the photos. I picked these up from my local Asian fishmonger store. They couldn't exactly tell me where these were from (probably because they couldn't understand my broken mandarin), but on the sign it said they were called 'Jumbo Oysters'.

These are probably about triple the size of the usual Sydney rock oysters I pick up from the Pyrmont fish market.

They were only $8 per half dozen, so I thought.. if I screwed them up, then it was only just an $8 lesson anyway. Its not like I'm playing around with a lobster or something like that. :)

With the oysters this big, the shell made a perfect sized container for the glass noodles, shallots and black bean sauce.


Steamed Jumbo Oysters with Black Bean Sauce

  • 1/2 Dozen of Jumbo Oysters
  • 1 packet Glass Noodles (soaked in cold water for about 8-10 mins then drain)
  • 1 stalk chinese green onion (thinly sliced diagonally)
  • 12 coriander leaves (handpicked)
Arrange the drained glass noodles on top of the oysters then add the sliced up green onions and the coriander leaves.

Mix together in a bowl, using a spoon to mince up the black beans:
  • 3 tablespoons light soy sauce
  • 1 tablespoon fresh fermented black beans (rinsed through water)
  • 1 small red chilli (finely sliced)
  • 1 teaspoon of white sugar
Add about 1/2 tablespoon of the black bean sauce mixture over the oysters. And bring some water to boil in a wok, place the oysters on top of a steamer stand in the wok and let steam for about 3-4 minutes.

Place about 3 tablespoons of vegetable oil in a saucepan on high heat. After a couple of minutes, pour a couple of drops of the hot oil over each oyster. This will quickly cook the green onions and black beans.

Notes:
  • I buy the individually packed glass noodles. If you aren't able to get the individually packed ones, then just break off about a handful of noodles.
  • Fermented black beans can be found at Asian supermarkets. One packet will last forever in your fridge if you place it an airtight container after 1st open. You do need to rinse through the black beans with some water prior to using it. This takes away some of the saltiness and also removes any sand or grit that maybe present.

23 September 2009

Stuffed Capsicum & Black Bean Sauce

I remember posting up a similar dish, but using eggplants instead of capsicum. I'm usually not a capsicum fan, but we had quite a bit left over in the fridge after our recent thai curry escapade. The boys seemed to enjoy it a lot more than the eggplant version though. They managed to finish all the steam rice I had cooked for the night (I usually have enough leftover to be able to make fried rice the next day !!) with just this dish alone.

To key is to be able to get your hands on some fresh fish paste. I've tried using frozen ones from the Asian groceries and it never really taste the same. Most Asian fishmongers will have fish paste. Or you can use a food processor and make your own with some inexpensive white fish. If you are making your own, after processing it through the food processor, you need to grab the paste in one hand and throw it down into a large bowl so it makes a 'spat' sound for a couple of minutes. This process, which my daddy taught me (and he is a chef), makes it turn in a fish paste that he calls 'sticky' and it holds together better. And also according to him.. I quote: 'Has a nicer texture when eating it'.

I have only made my own fish paste once (before I discovered it was readily available at my local Asian fishmonger at $5 a packet), after that I've never really bothered to make my own. It was just a bit too much work. >.<

Stuffed Capsicum with Black Bean Sauce
Original recipe passed to me from my grandma

  • 2x Capsicums (seeds removed, sliced into 1/4 lengthwise, then halved again crosswise into chunks)
  • Small bowl of Cornflour (to be used during the 'stuffing' process)
  • ~300g White Fish paste (from chinese grocery shops)
  • 2 tablespoon of dried shrimp (soaked in water, finely chopped - water reserved)
  • 3 tablespoons of coriander (roughly chopped)
  • 1/2 teaspoon of salt & a pinch of ground white pepper

Sauce:

  • Dash of vegetable oil
  • 2 garlic cloves (smashed and finely chopped)
  • 1 tablespoon of fermented black beans (fresh or use black bean paste from chinese grocery shops)
  • 1 fresh red chilli (finely chopped)
  • 2 tablespoon of light soy sauce
  • 1 tablespoon of oyster sauce
  • 2 teaspoons of white sugar

Method:

  1. To prepare the capsicum, remove the seeds and slice into quarters lengthwise, then crosswise into half. You should have 8 pieces from each capsicum.
  2. Mix together the fish paste with dried shrimps and coriander. Season with salt and white pepper.
  3. Rub some cornflour on the insides of the eggplant piece and place about 1 tablespoon of the mixed fish paste into the eggplant. (The cornflour helps hold the fish paste in place).
  4. Shallow fry the stuffed capsicum pieces in some hot oil.
  5. Remove the pieces as the capsicum pieces start to blacken a bit and set aside.
  6. In a medium hot wok, add the oil then stir in the garlic. Add in the stuffed capsicum pieces and pour in the mixture of black bean, chilli, soy sauce, oyster sauce and sugar. Keep on stirring the contents around so it wont burn too easily.
  7. Add a couple of tablespoons of the reserved shrimp water in and continue stir frying the stuff capsicum pieces around. Each piece should have a coating of the black bean sauce.

Serve with some steamed white rice. Enjoy :)


Related Posts with Thumbnails